
MIA Merchant Portal — user guide
The merchant's web back office: follow the money coming in, and start payments too — payment links and payment requests are sent from the portal itself. Plus refunds, disputes, reports, stores, terminals, sellers and users.
Introduction
What is MIA Merchant Portal
MIA Merchant Portal is the merchant’s web admin panel within the miaPOS ecosystem (Finergy Group). Through this portal, the merchant monitors and manages their payment activity: transactions, POS terminals, stores, sellers, and users with portal access.
The portal covers:
- Dashboard — statistics and charts about transactions, for selectable periods.
- Transactions — the list of payments processed across all channels (POS, E-COMM, RTP), with filtering, details, and refunds.
- Online Operations — payment links and payment requests (Request to Pay).
- Disputes — the correspondence and status of disputes between the merchant and their bank.
- Reports — downloadable reports (e.g., the B2B Payments report).
- Administration — stores, terminals, sellers, users with portal access, and the merchant profile.
Access is through a web browser, by signing in with your phone number and a confirmation code (OTP) — see the Authentication chapter. No app installation is required.
Roles and permissions
Each user with portal access has one or more of the following 4 roles, assigned from the Users section (see the Administration chapter); role rights are cumulative. In the interface, roles appear under their technical names: admin, manager, reporter, seller. The role determines which sections of the portal are accessible.
| Section | Admin | Manager | Reporter | Seller |
|---|---|---|---|---|
| Dashboard | ✓ | ✓ | ✓ | — |
| Transactions | ✓ | ✓ | ✓ | ✓ |
| Online Operations (links, RTP) | ✓ | ✓ | ✓ | ✓ |
| Disputes | ✓ | ✓ | ✓ | — |
| Reports | ✓ | ✓ | ✓ | — |
| Administration (stores, terminals, sellers, users, profile) | ✓ | ✓ | ✓ | — |
The seller role only works with Transactions and Online Operations. The Reports and Administration sections don’t appear in the sidebar menu at all for this role; if an attempt is made to open another section without the required rights, the portal displays the message “You do not have access to this page” and returns to the first available section.
Merchant profile: within the Administration → Merchant Profile section, editing the data (logo, tips report email, enabling e-comm support) is available only for the admin and manager roles. The reporter role sees the same information, but in read-only mode.
Authentication
Signing in to MIA Merchant Portal takes two steps: your phone number, then a confirmation code (OTP) sent via SMS. The portal does not use a password to sign in.
Step 1 — phone number
On the start screen, enter your phone number registered in the portal (the number you were added with as a user — see the Administration chapter, Users section), in the format (+373) 00-000-000.
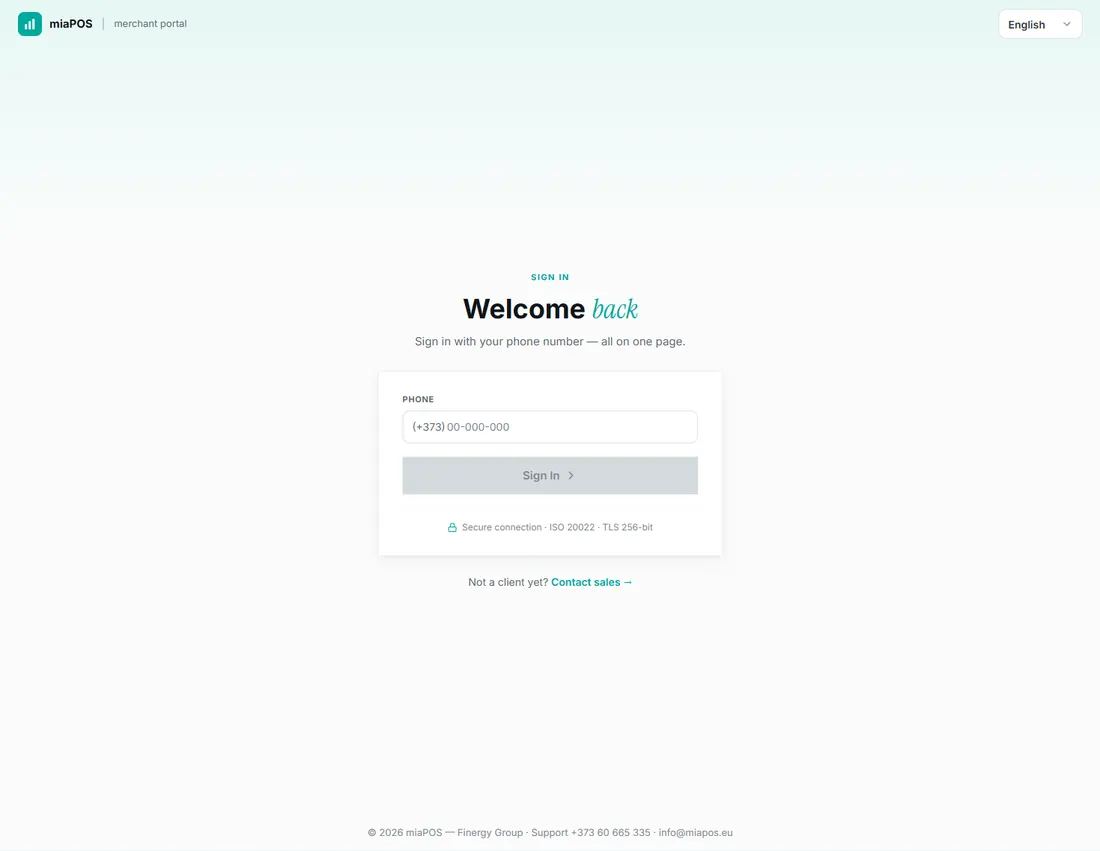
The Sign In button stays inactive until the number is filled in. Once a valid number is entered, the button becomes active:
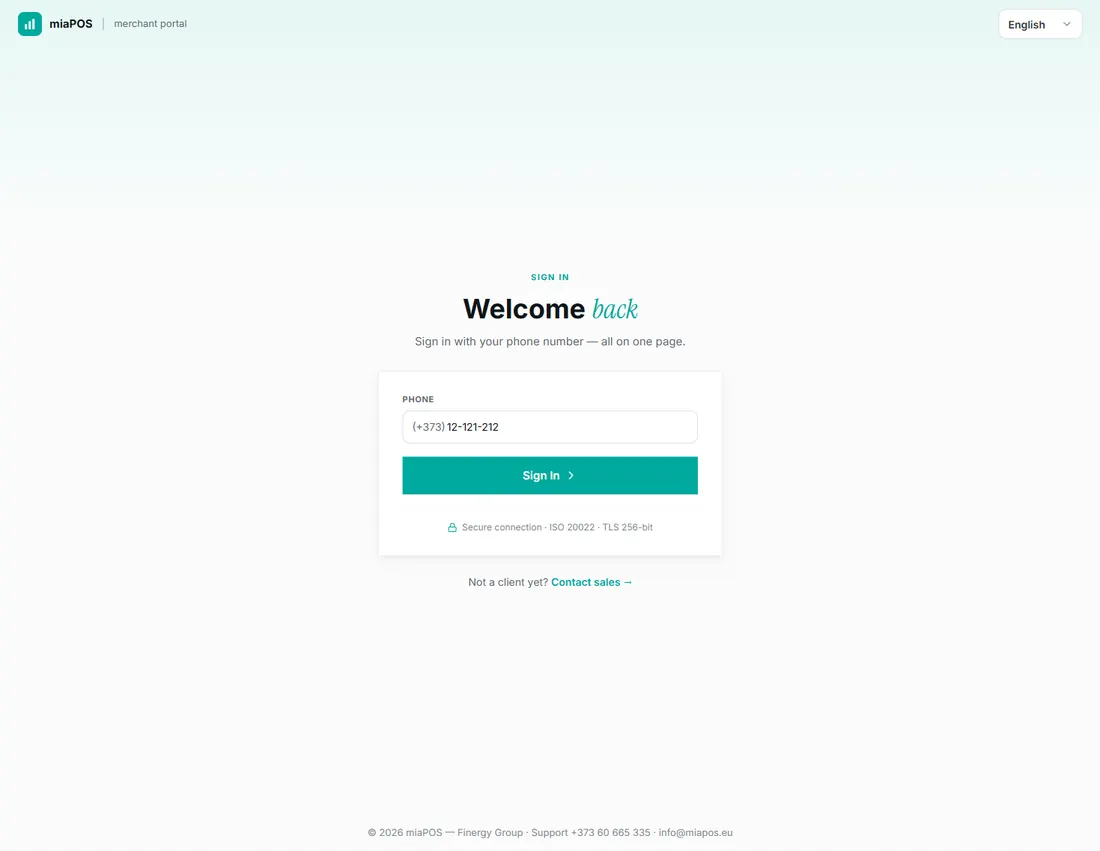
If the entered number is not registered in the system, the portal displays an error message — the merchant for that number was not found — and stays on this screen.
Step 2 — confirmation code (OTP)
After pressing the Sign In button, the portal sends a 6-digit code via SMS to the entered number and opens the confirmation screen.
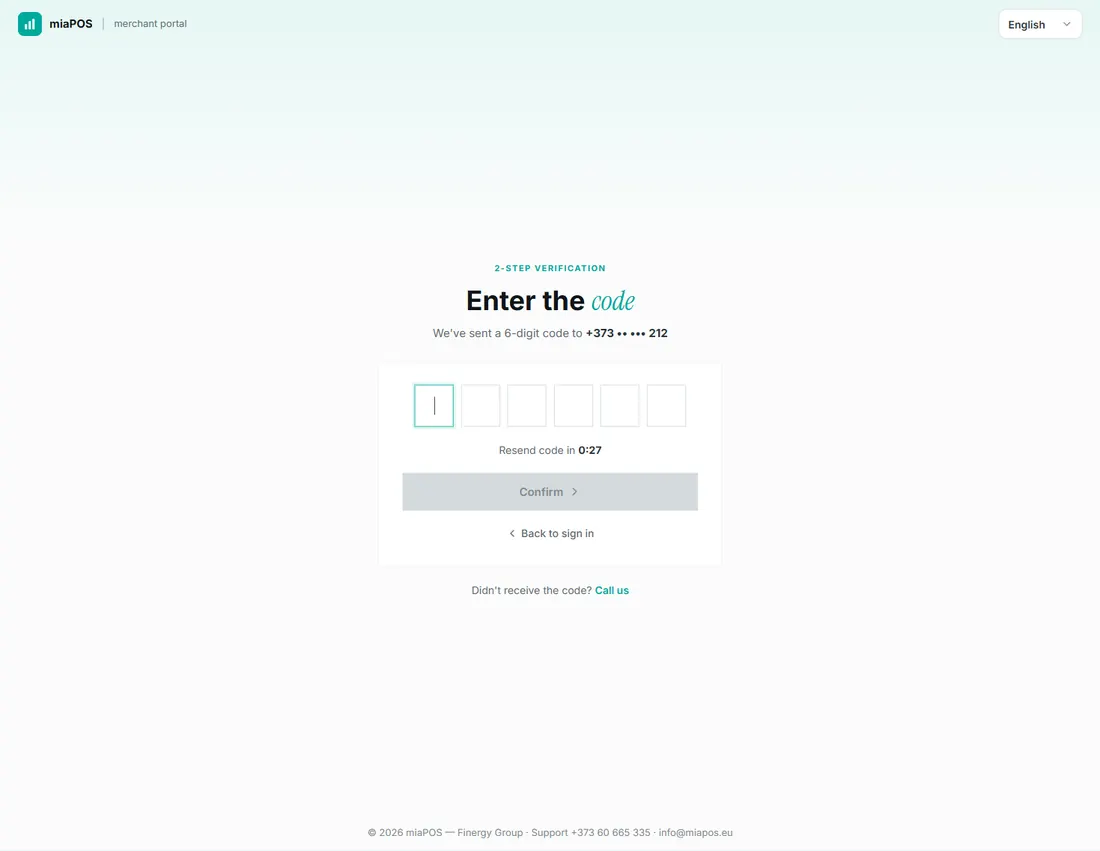
Enter the code you received via SMS. The Confirm button becomes active once all 6 digits are filled in:
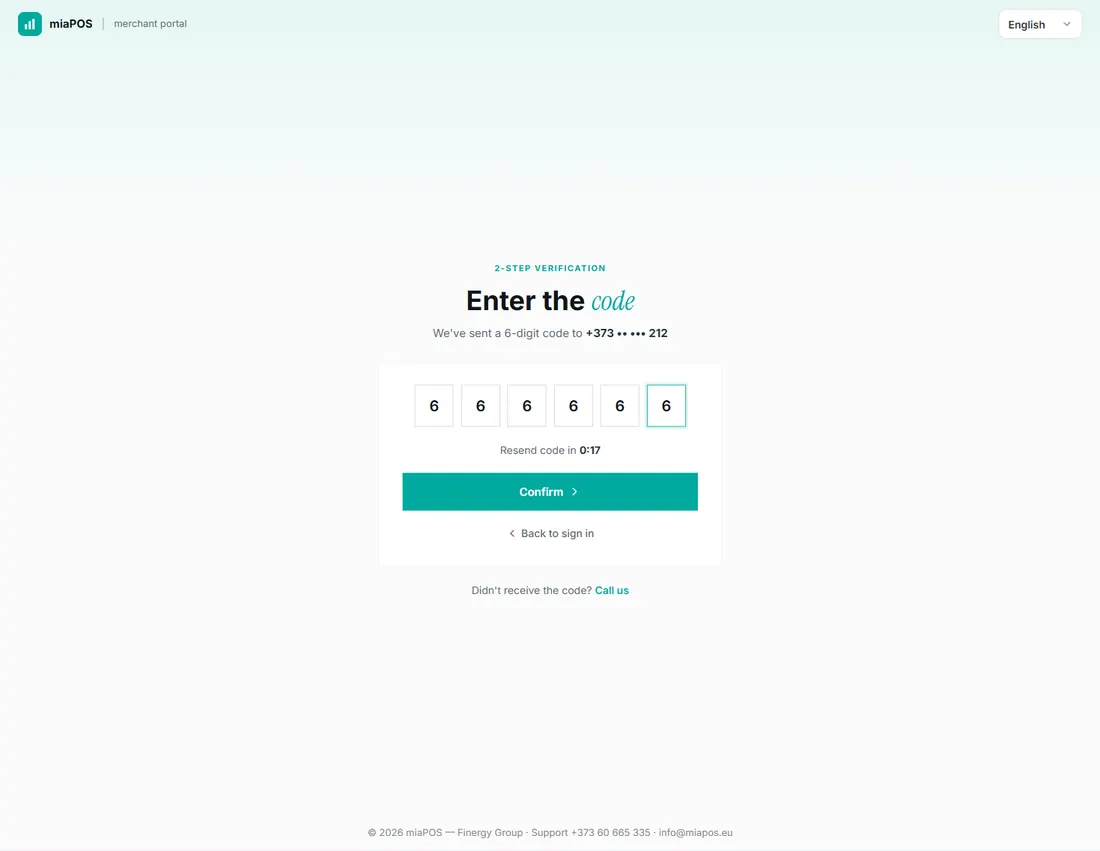
If you didn’t receive the code: - Press Send again, below the code fields, to request a new code — the option becomes available once the displayed timer expires (“Resend code in…”). When resending, the digits already entered are cleared and the timer starts again. - Press Call us, below the confirmation box, to contact support by phone.
If you enter an incorrect code, the portal displays an error message, clears the 6 fields, and lets you try again. The fields accept digits only.
The Back to sign in button returns to step 1 — use it if you entered the wrong phone number.
For security reasons, the number of code resends and entry attempts is limited. If the limit is exceeded, the portal displays a corresponding message and returns to the phone number step — try again later.
Successful sign-in
Pressing Confirm with a valid code signs you in and takes you directly to the Transactions section of the portal.
Portal language
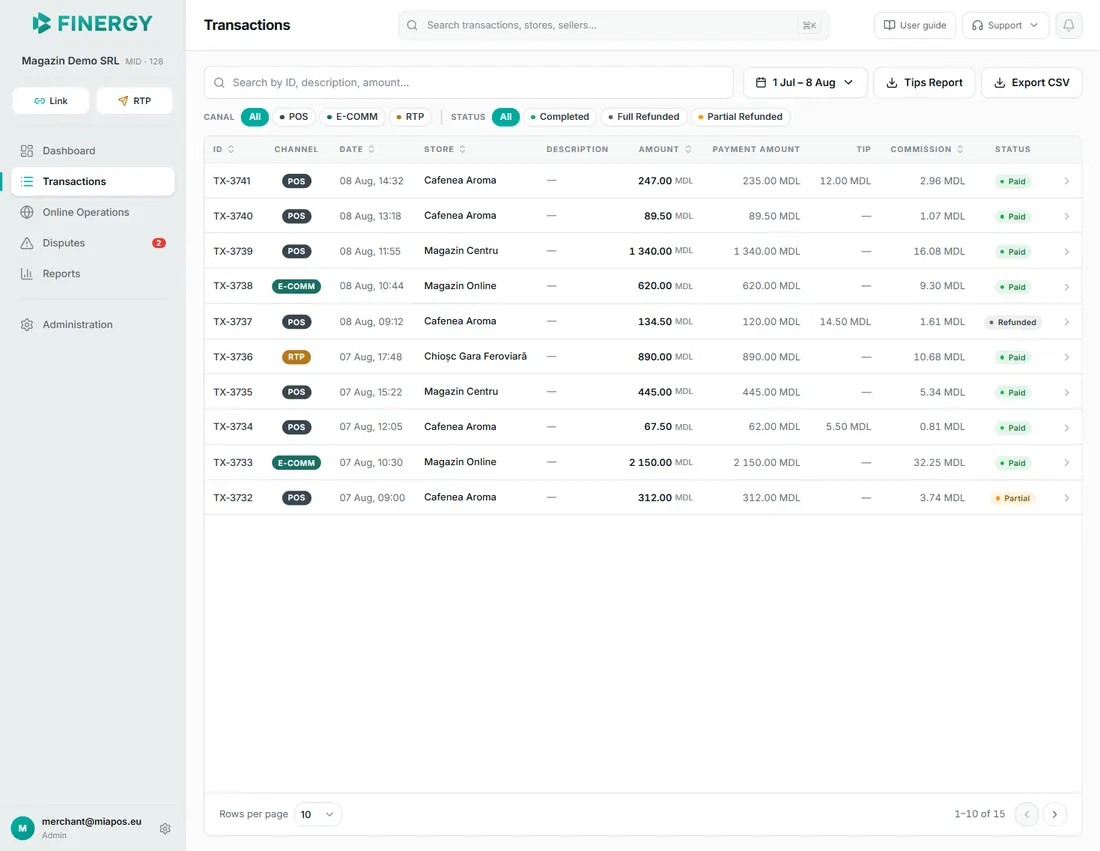
The display language is chosen from the menu in the top-right corner, available even from the sign-in screen. The portal is available in 5 languages: Romanian, Russian, English, German, and French.
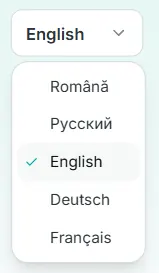
The selected language is kept after signing in too — it can be changed at any time from the account settings (see the Platform Features chapter).
Dashboard
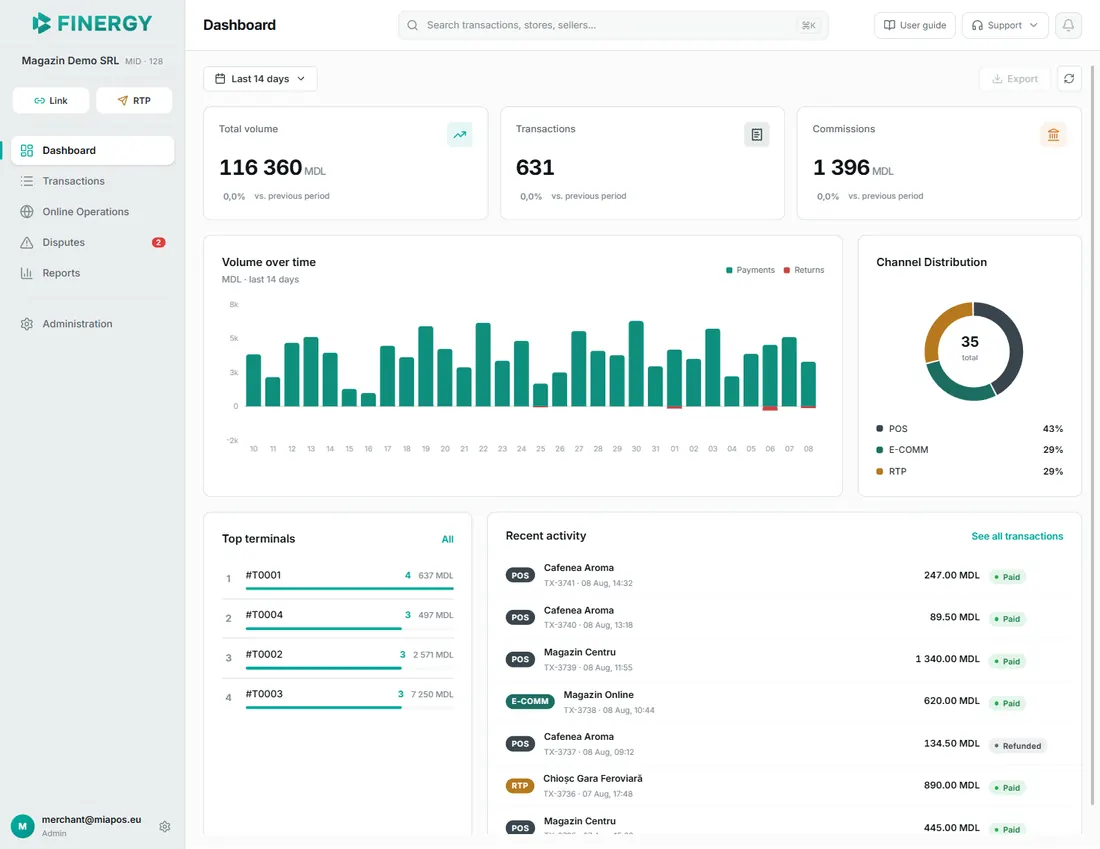
The Dashboard page provides an overview of payment activity: volume, number of transactions, commissions, channel distribution, and recent transactions. It’s visible to the admin, manager, and reporter roles — the seller role does not have access to this section.
Displayed period
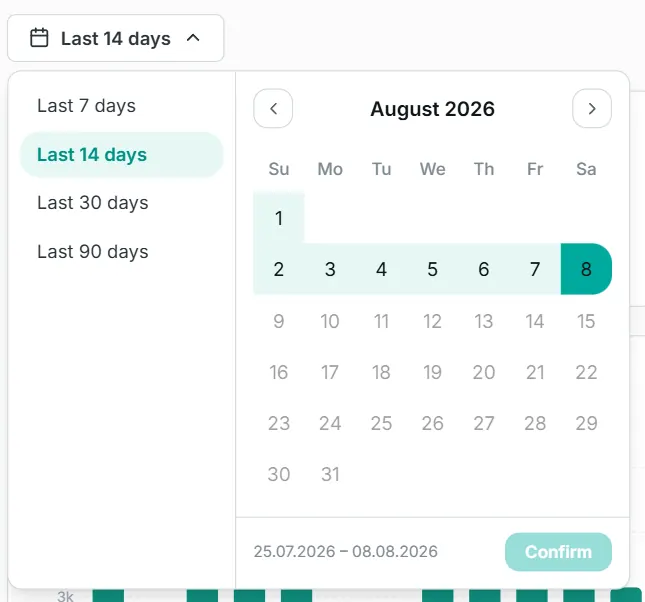
At the top of the page, choose the period for which all the data is calculated. 4 quick presets are available — Last 7 days, Last 14 days, Last 30 days, Last 90 days — or a custom range from the calendar, confirmed with the Confirm button. When the page opens, the Last 14 days period is selected by default.
The refresh button (the circular-arrows icon) manually reloads the data for the current period.
The Export button is disabled — the export feature on the Dashboard is not yet available.
Key indicators (KPI)
Three cards display the main indicators for the selected period, each with the change compared to the previous period (an interval of the same length, immediately before it; if it contains no data, the change is shown as “—”):
- Total volume — the sum of all transactions.
- Transactions — the total number of transactions.
- Commissions — the sum of commissions withheld.

Volume chart
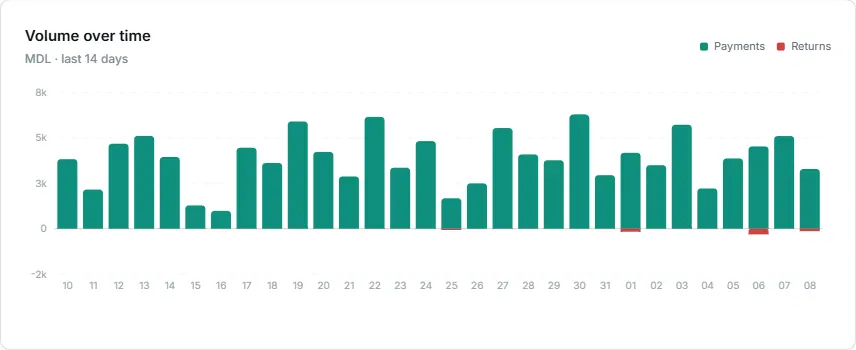
The “Volume over time” card shows payments and returns by day, for the selected period: payments rise above the zero line, returns drop below it (the Payments / Returns legend is shown next to the title). Hovering over a day shows a tooltip with that day’s details: the number of transactions, the payment amount, and the number and amount of returns.
Channel distribution
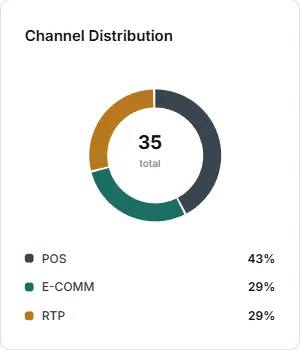
A radial chart shows how the number of transactions is split across payment channels: POS, E-COMM, and RTP. The total number is displayed in the center of the chart.
Top terminals
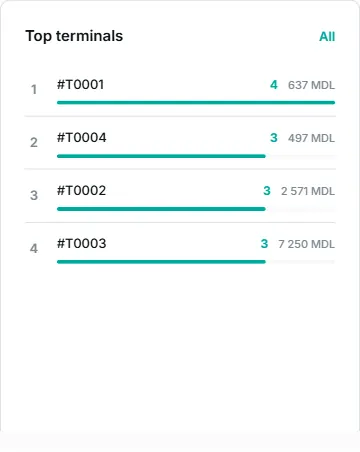
The top 4 terminals by number of transactions in the selected period. The All button opens the Terminals section. If there is no data, the message “No terminals available” is displayed.
Recent activity
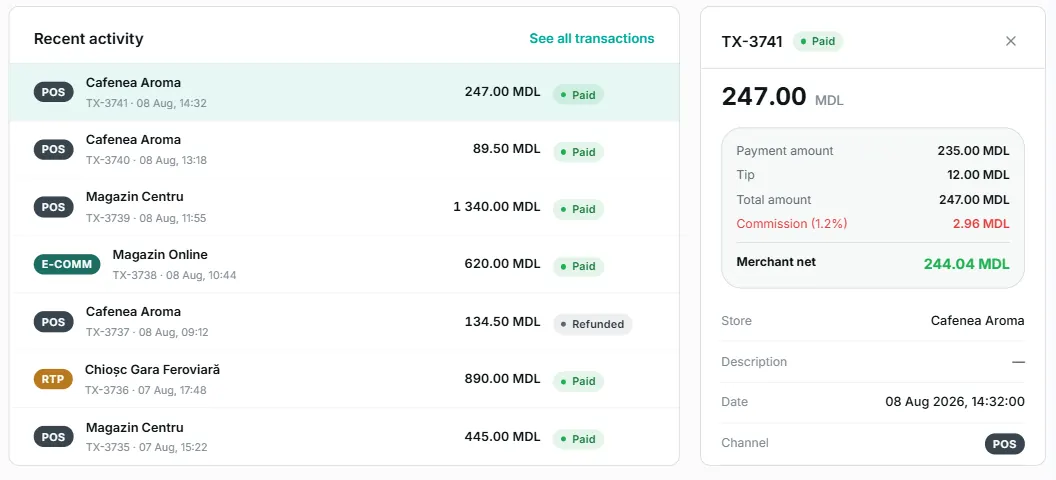
The last 7 transactions from the selected period, shown in a list: the channel, the store, the TX ID, the date, the amount, and the status. The “See all transactions” button leads directly to the Transactions section.
Clicking a transaction in the list opens its details panel. For a refund, the Refund button in the panel opens that transaction in the Transactions section, where the operation is completed.
Transactions
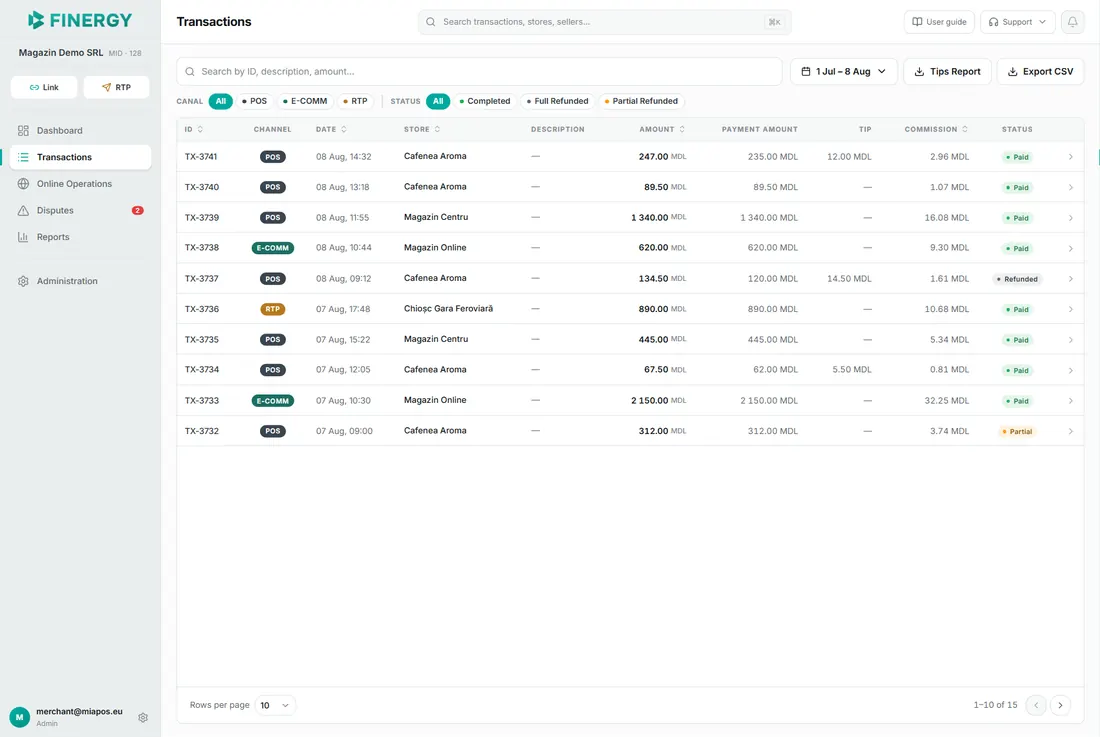
The Transactions section shows all payments processed by the merchant, across all payment channels: POS, E-COMM, and RTP. The section is visible to all roles — admin, manager, reporter, and seller.
Viewing and filtering
The table shows one row per transaction, with the following columns:
- ID — the transaction identifier (e.g., TX-1024).
- Channel — the payment channel: POS, E-COMM, or RTP (older transactions may also show LINK or BOT).
- Date — the date and time of the transaction.
- Store — the store where the payment was made.
- Description — the payment description.
- Amount — the total transaction amount, with the currency.
- Payment amount — the base amount, without the tip.
- Tip — the tip, if any.
- Commission — the commission withheld.
- Status — the transaction status, shown as a label: Paid, Refunded, or Partial.
The ID, Date, Store, Amount, and Commission columns can be sorted by clicking the column header.
Above the table are the search and filter tools:
- Search bar — searches by ID, description, or amount. Results update automatically shortly after you type.
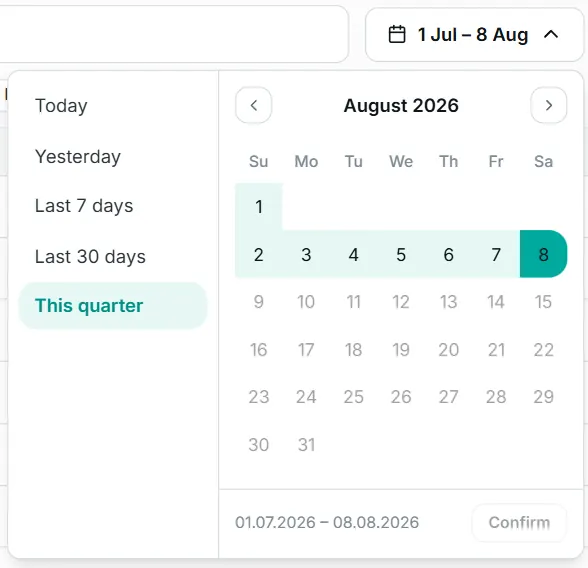
- Period filter — the button with the date range opens a menu with 5 presets (Today, Yesterday, Last 7 days, Last 30 days, This quarter) and a calendar for a custom range. For a custom range, select the start date and end date in the calendar, then press Confirm.
- Channel filter — All, POS, E-COMM, RTP.
- Status filter — All, Completed, Full Refunded, Partial Refunded (corresponding to the Paid, Refunded, and Partial labels in the table).
When the section opens, the list shows the current quarter’s transactions by default, up to today.

The list is paginated: at the bottom of the table, choose the number of rows shown per page — 10, 25, 50, or 100 — and navigate between pages.
Refunding a transaction
A completed transaction can be refunded in full or in part, directly from the details panel (see the Transaction details subsection).
Open the transaction details and press the Refund button at the bottom of the panel. The button is active only for paid transactions that can still be refunded; for a transaction that has already been refunded, or for which the bank does not allow a refund, the button stays inactive. If a refund request still isn’t possible, the portal displays the message “Refunds are not possible for this transaction.”

The Revert summ window opens, with a reason preselected and the description filled in automatically — both can be changed:
- Reason — the reason for the refund, chosen from the dropdown list (required).
- Reason description — the refund description, freely editable (required).
For a partial refund, turn on the Partial refund toggle and enter the amount in the Partial refund amount field. The amount entered cannot exceed the transaction value — otherwise an error message is shown, and the refund cannot be confirmed.
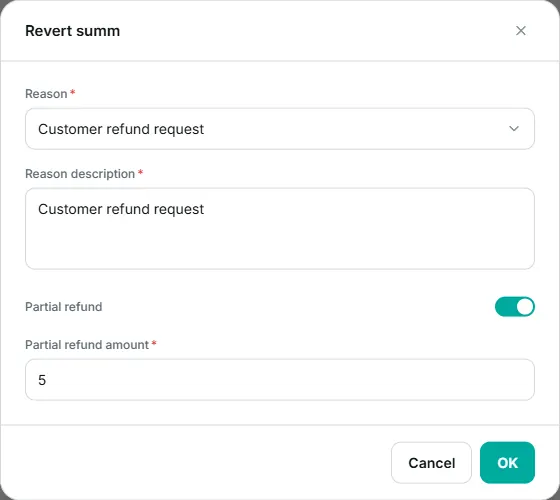
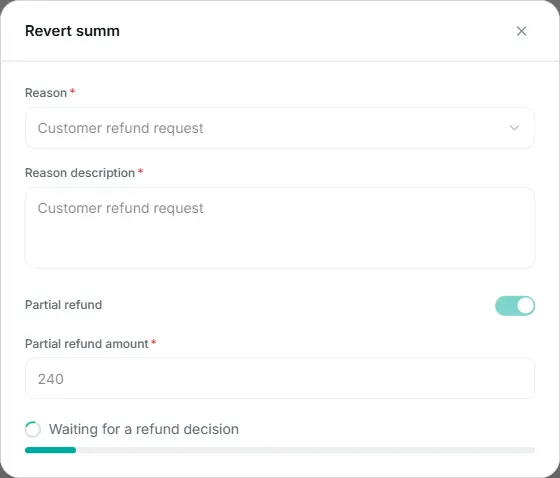
Press OK to confirm. The window displays the message “Waiting for a refund decision” and a progress bar until a response is received; the window can be closed in the meantime — the request continues in the background. After confirmation, the transaction’s status updates in the list (Refunded or Partial). If the request is declined or the waiting time expires, the portal displays a corresponding message — check the transaction’s status in the list.
Exporting transactions to CSV
The Export as CSV button, located above the table, downloads a .csv file with all the transactions matching the applied filters — search, period, and status — not just the displayed page. The Channel filter does not apply to the exported file. The button is inactive while the list is loading, during export, or when the list contains no transactions.
The downloaded file can be opened in external applications (e.g., Excel) for reporting and bookkeeping.
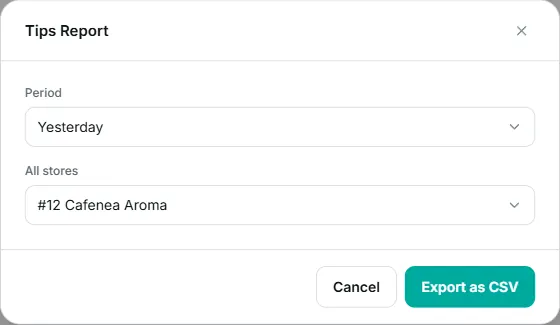
The Tips Report button downloads a separate CSV report, containing only the tips collected. In the window that opens, choose:
- Period — Yesterday, Day before yesterday, Last week, or Custom period (with a start date and end date).
- All Stores — keep all stores, or choose a specific store from the list.
Press Export as CSV to download the report. If there are no tips in the chosen period, the message “No data” is displayed.
Transaction details
Clicking a transaction in the list opens the details panel — a side panel that slides in from the right, over the page content.
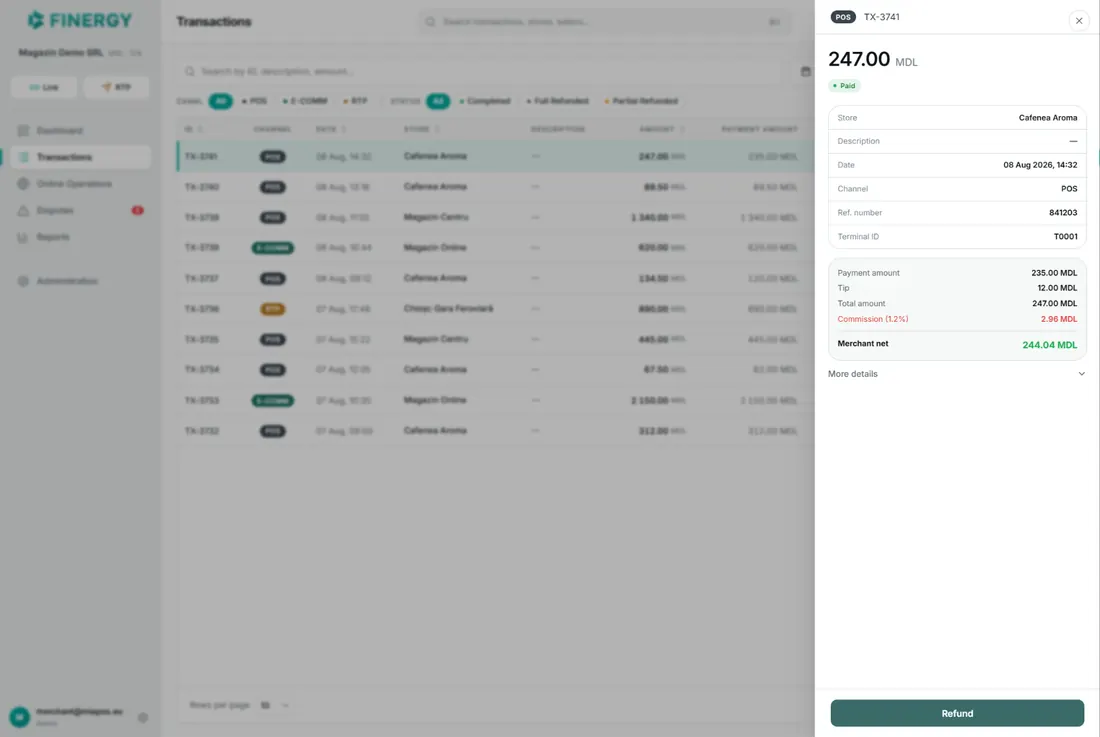
The panel shows:
- The header — the payment channel and the transaction ID.
- The transaction amount and its status.
- The information card — Store, Description, Date, Channel, and, where available, Ref. number and Terminal ID.
- The amount breakdown — Payment amount, Tip, and Total amount (when the portal receives the payment components) or Gross amount; then Commission (with the applied percentage, when available) and Merchant net — the net amount received by the merchant.
The More details link expands the panel with additional information, shown only if available for that transaction: Terminal ID, POS ID, Seller, MCC, Approval code, the address of the store where the payment was made, the SWIFT data (message type, message ID, payer’s SWIFT code), Payment system, Client name, Client fiscal code, and Transaction type code.
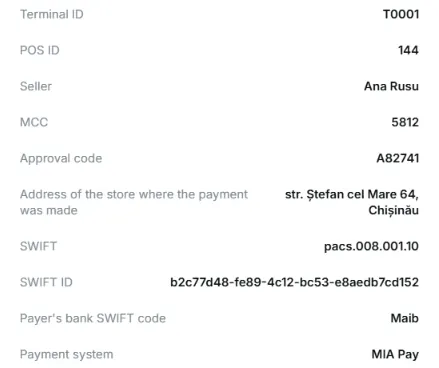
The Refund button at the bottom of the panel starts the refund process (see the Refunding a transaction subsection).
Online Operations
The Online Operations section brings together remotely initiated payments: payment links and payment requests (Request to Pay). The section is visible to all roles — admin, manager, reporter, and seller.
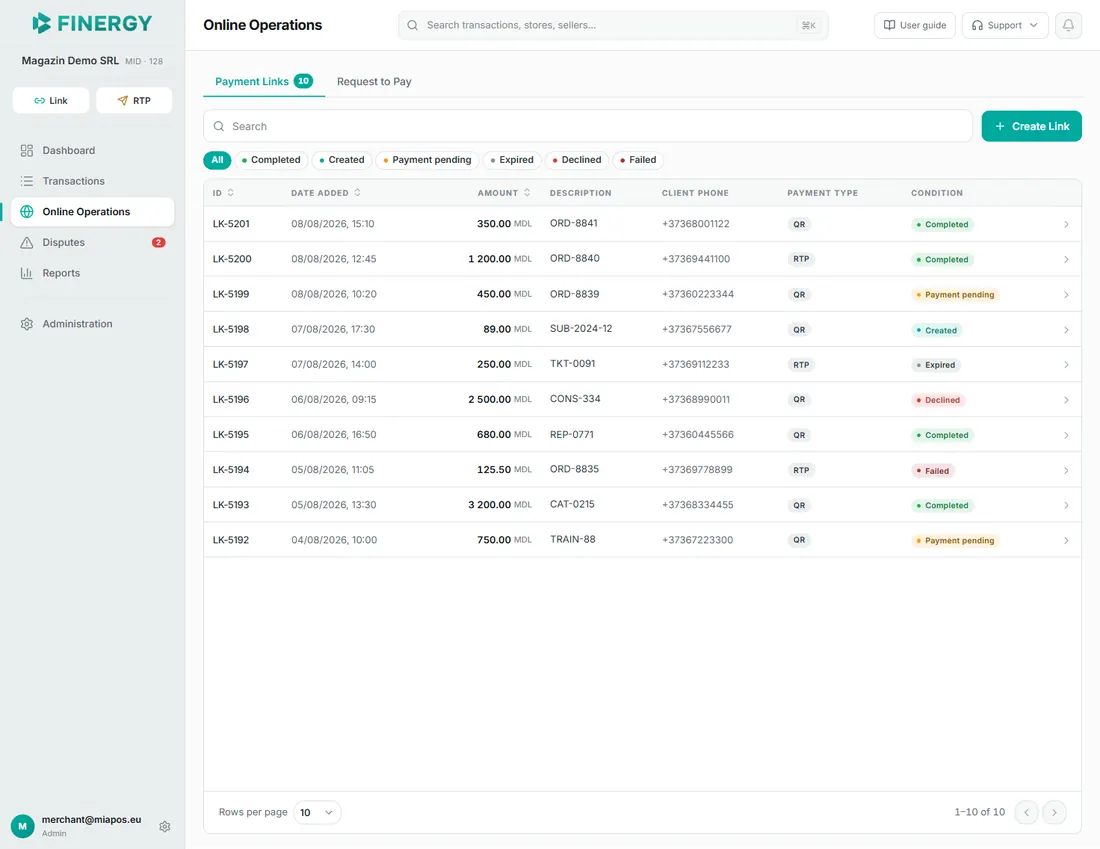
At the top of the page are two tabs: Payment Links and Request to Pay; the open tab shows, next to it, the number of records found with the current filters. The sidebar menu also contains the quick buttons Link and RTP, which open the creation forms directly — New payment link and Create RTP, respectively — without going through the lists.
Payment Links
The Payment Links tab shows all the payment links created by the merchant. The table contains the columns:
- ID — the link identifier (e.g., LK-204).
- Date added — the date and time it was created.
- Amount — the payment value, with the currency.
- Description — the order ID or the store name.
- Client phone — the client’s phone number, if available.
- Payment type — the method used (e.g., QR, RTP).
- Status — the payment status.
Above the table are the search bar and the status filter: All, Completed, Created, Payment pending, Expired, Declined, Failed. The ID, Date added, and Amount columns can be sorted by clicking the column header. The list is paginated (10/25/50/100 rows per page).

To create a new link, press the Create Link button. The New payment link page opens, where you fill in the required fields:
- Amount request — the payment value.
- Select terminal — the terminal associated with the payment.
- Payment Description — the purpose of the payment, visible to the client.
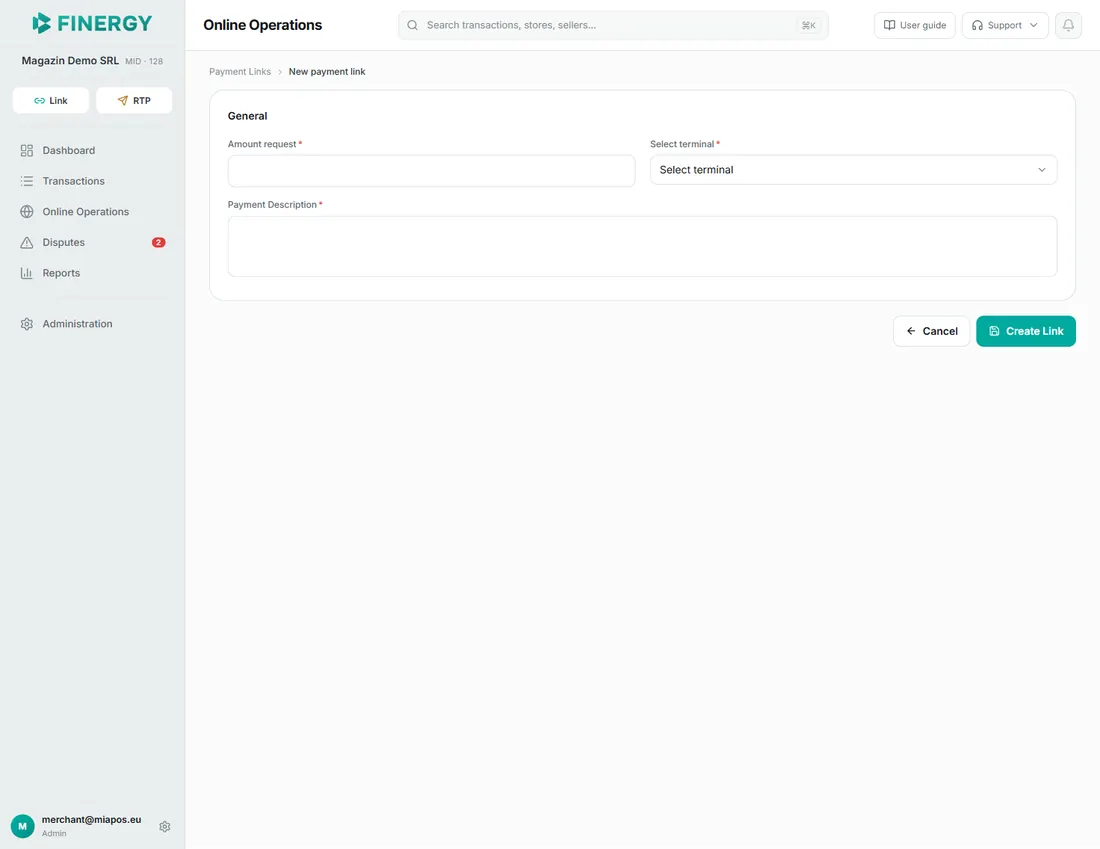
After pressing the Create Link button, the page displays the Payment link created block with the address of the payment page. Press Copy to copy the link and send it to the client. The Back to Payment Links button returns to the list.

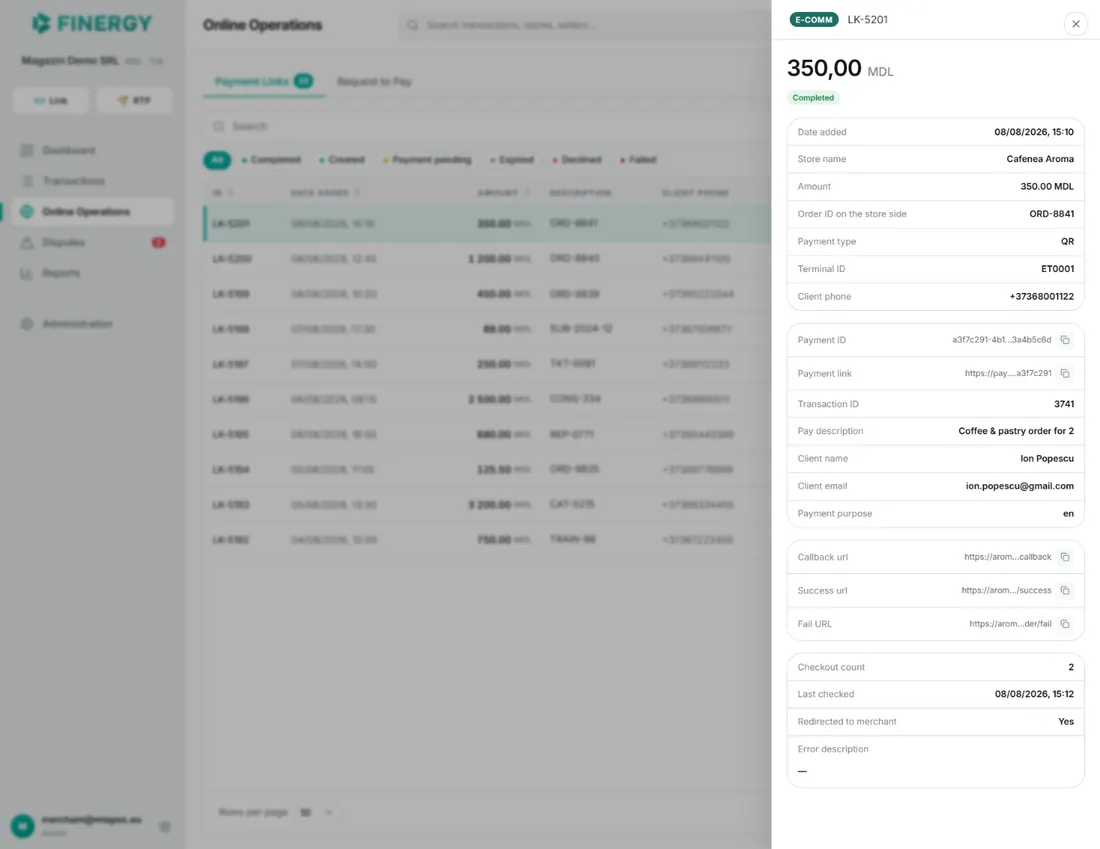
Clicking a link in the list opens the details panel (LK followed by the ID), with the amount, status, and payment information: Date added, Store name, Amount, Order ID on the store side, Payment type, Terminal ID, and Client phone. A second card shows Payment ID and Payment link (both with a copy button), Pay description, Client name, and Client email, followed by the technical integration addresses (Callback url, Success url, Fail URL — all with a copy button) and the payment verification information (Checkout count, Last checked, Redirected to merchant). The Error description row shows the error details for failed payments.
Request to Pay (RTP)
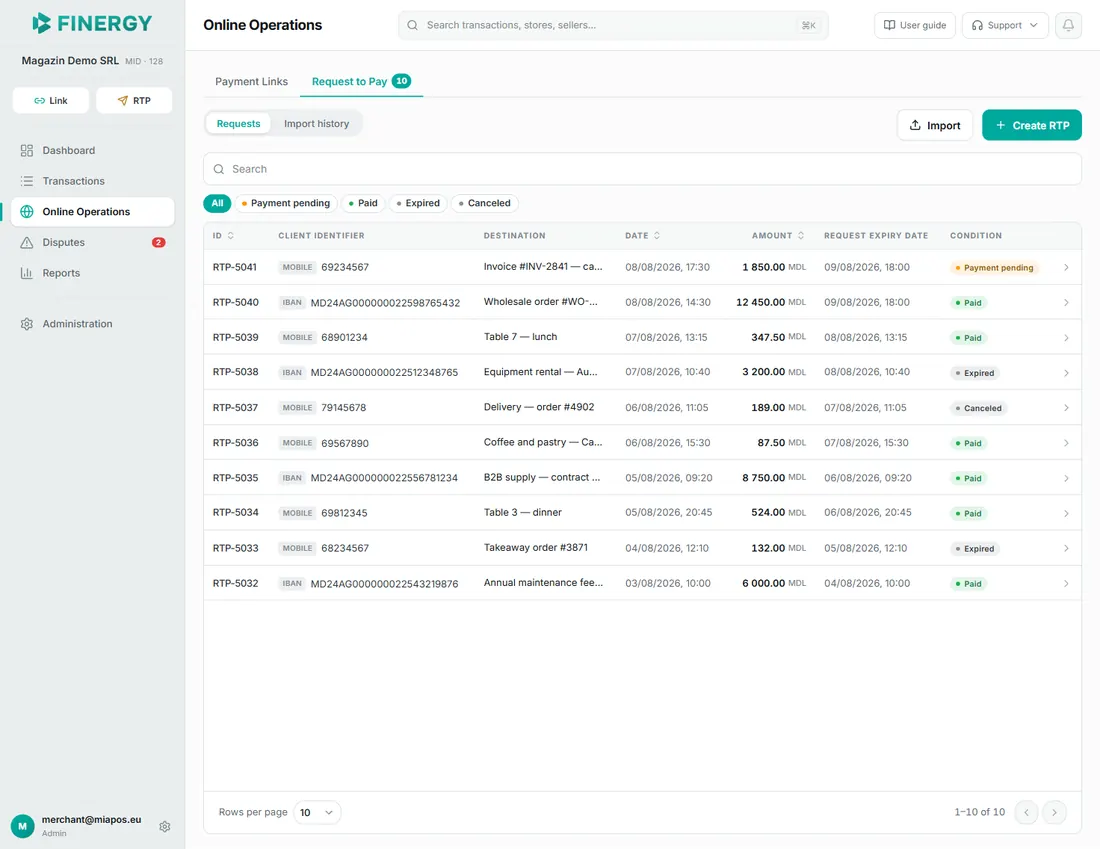
The Request to Pay tab manages the payment requests sent to clients via Request to Pay. The tab has two sub-tabs: Requests and Import history. Next to them is the Import button (see the Importing requests from a file subsection) and, on the Requests sub-tab, the Create RTP button.
The requests table contains the columns:
- ID — the request identifier (e.g., RTP-317).
- Client identifier — the recipient’s phone number or IBAN, with a type label (MOBILE or IBAN).
- Destination — the request description.
- Date — the date and time it was created.
- Amount — the request value, with the currency.
- Request Expiry Date — the deadline by which the request can be paid.
- Status — the request status: Created, Payment pending, Paid, Expired, Canceled, Denied, or Error.
Above the table are the search bar and the status filter: All, Payment pending, Paid, Expired, Canceled (requests with the Created, Denied, and Error statuses are found under All). The ID, Date, and Amount columns can be sorted by clicking the column header; the list is paginated (10/25/50/100 rows per page).
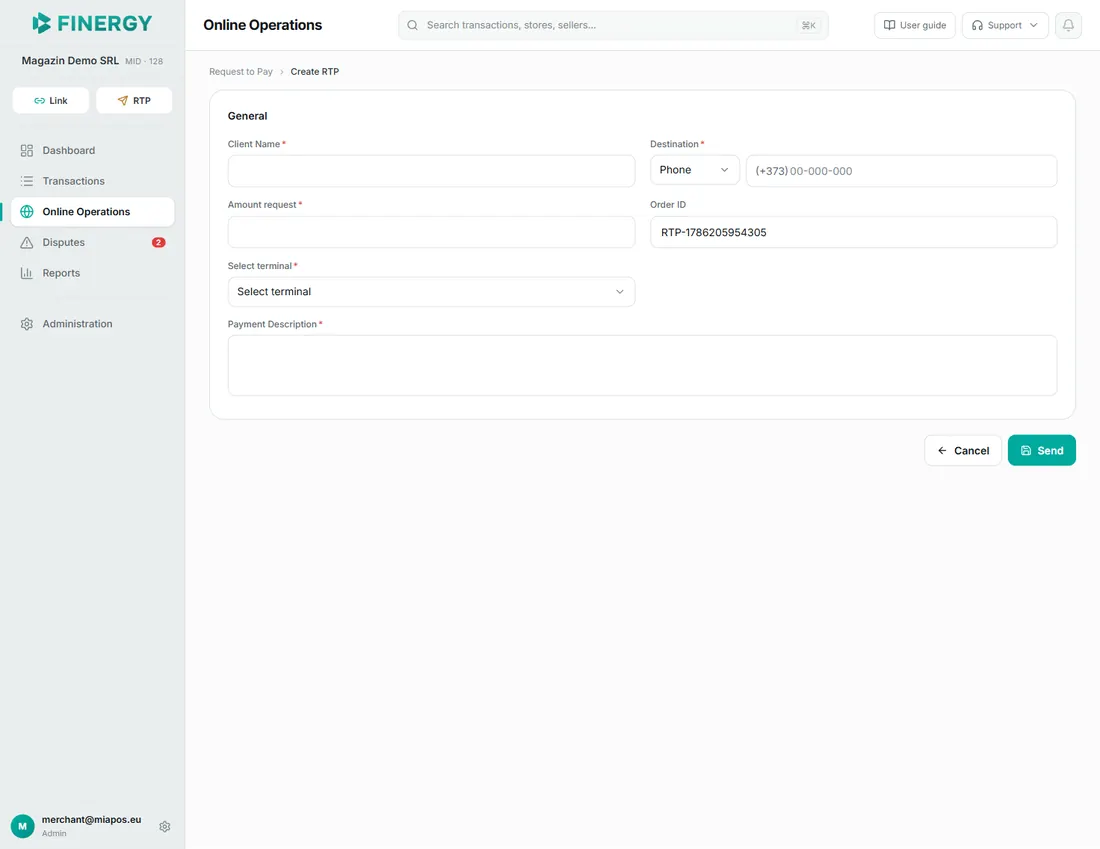
To send a new request, press the Create RTP button. The creation page opens, where you fill in:
- Client Name (required).
- Client Phone Number (required) — the +373 prefix is filled in automatically.
- Amount request (required).
- Order ID — the order identifier; it is generated automatically and can be changed.
- Select terminal (required) — the terminal the request is sent from.
- Payment Description (required).
Press Send to dispatch the request — it appears in the requests table. The Cancel button returns to the list without sending.
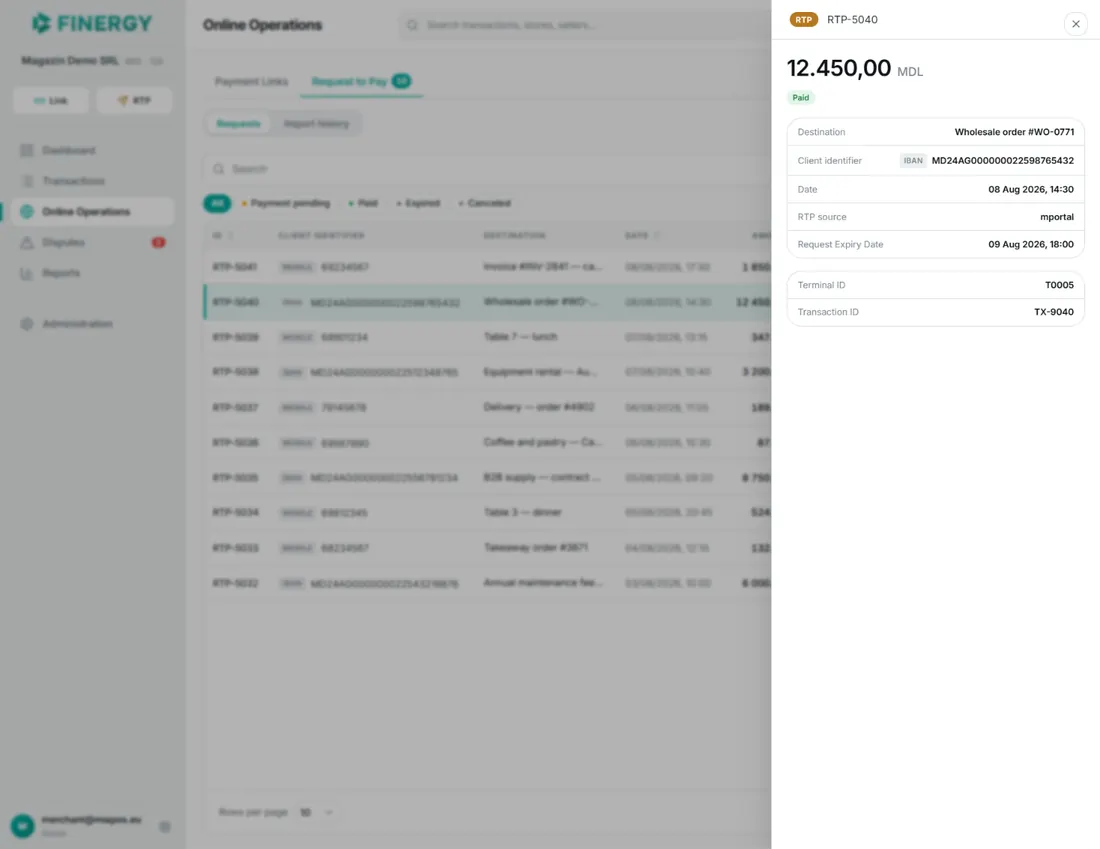
Clicking a request in the list opens the details panel (RTP followed by the ID), with the amount, status, and request information: Destination, Client identifier, Date, RTP source (the platform the request was generated from — e.g., ecomm or mportal), and Request Expiry Date. A second card shows, where available, Terminal ID, External Request ID, Transaction ID (the transaction resulting from the payment), Error Code and Error Message (for failed requests), and Last Update Date.
Importing requests from a file
The Import button lets you send multiple payment requests from a single file. Pressing it opens the Import file window, where you fill in:
- Select terminal (required) — the terminal the requests are sent from.
- Select file (required) — drag the file into the marked area, or click it to choose one. Only .csv and .xlsx files are accepted.
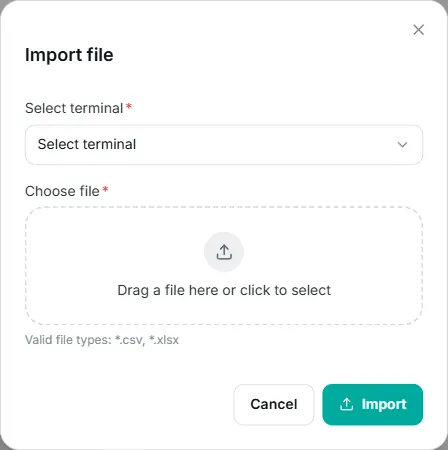
Press Import to send the file. Once the file is accepted, the window closes, a confirmation message appears, and the portal automatically switches to the Import history sub-tab, where you can track the processing. If the document contains invalid rows, the window stays open and shows the “Incorrect records in the document” block with the error details — these can be copied with the dedicated button, to correct the file or request support.
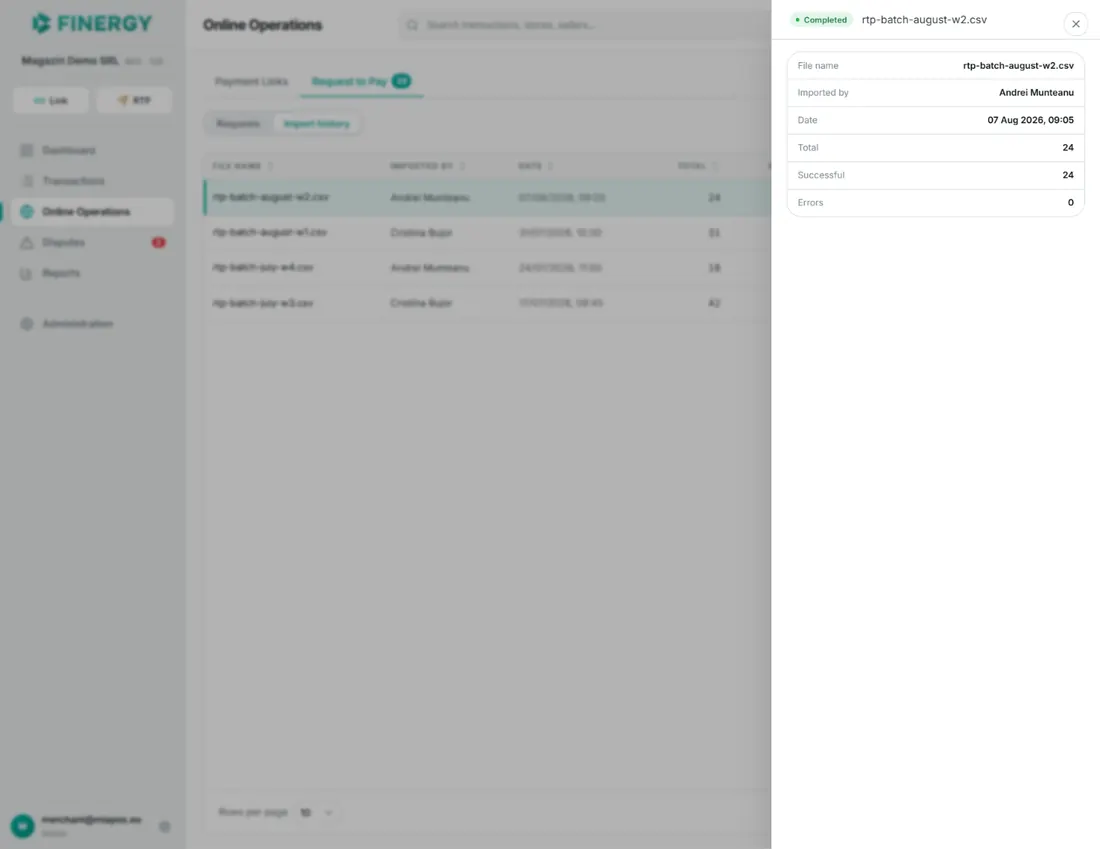
The Import history table shows: File name, Imported by, Date, Total (the number of records in the file), Successful, Errors, and Status (In progress, Completed, or Failed). Clicking a row opens the import’s details panel; for imports with issues, it also includes the Error details block.
Disputes
The Disputes section shows the disputes between the merchant and their bank, related to processed payments. Here you track the status of each dispute, communicate with the bank, and submit supporting documents. The section is available to the admin, manager, and reporter roles.
In the sidebar menu, the Disputes item shows a red badge with the number of disputes assigned to the merchant. The number updates automatically (within one minute at most) and disappears when there are no more disputes assigned to the merchant.
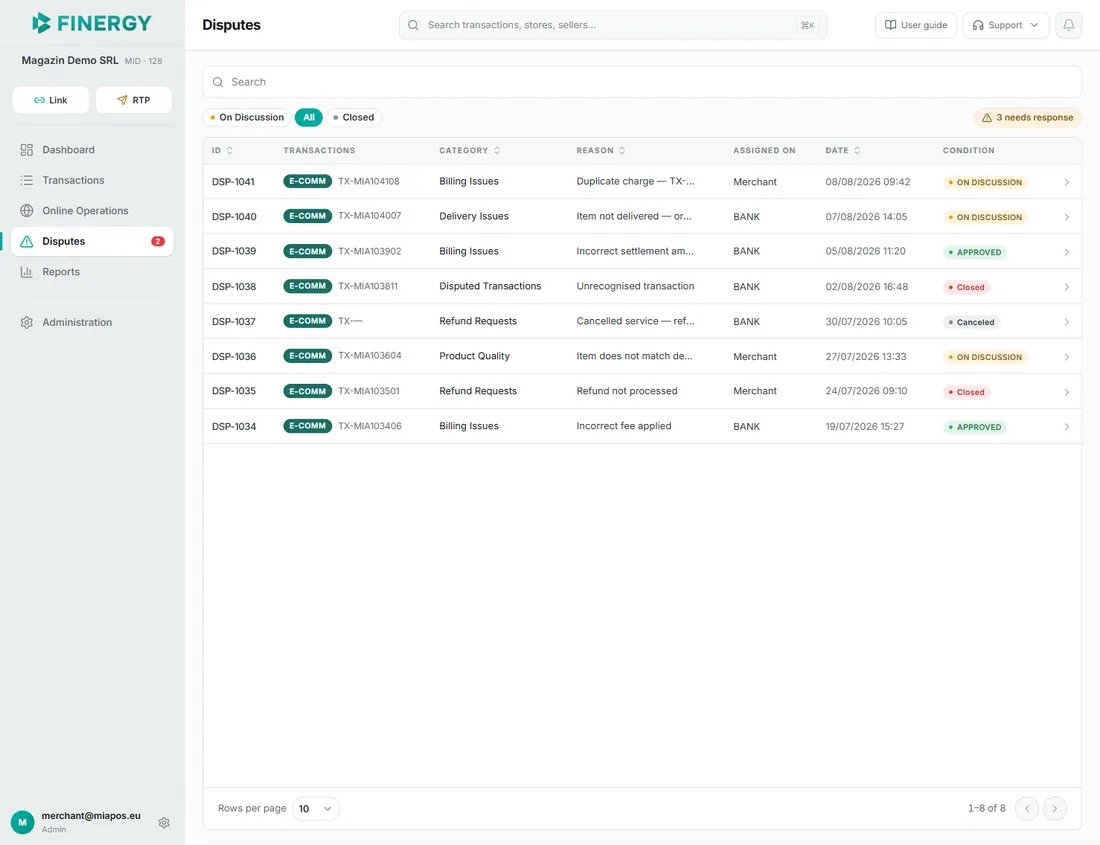
Disputes list
The table shows one row per dispute, with the following columns:
- ID — the dispute identifier (e.g., DSP-45).
- Transactions — the dispute’s external reference in the MIA system (TX-…).
- Category — the dispute category.
- Reason — the dispute title.
- Assigned on — who needs to respond at this moment: BANK or Merchant.
- Date — the date and time it was created.
- Status — the dispute status: ON DISCUSSION, APPROVED, Canceled, or Closed.
Above the table is the status filter with the options On Discussion, All, and Closed. The Closed filter shows only disputes with the Closed status; those with the Approved or Canceled status are found under All. When there are On Discussion disputes on the current page, a warning label with their number appears next to the filters (“needs response”).
The list is paginated (10/25/50/100 rows per page). The ID, Category, Reason, and Date columns can be sorted by clicking the column header.

Clicking a dispute in the list opens the details panel — a side panel that slides in from the right, over the page content.
Dispute details
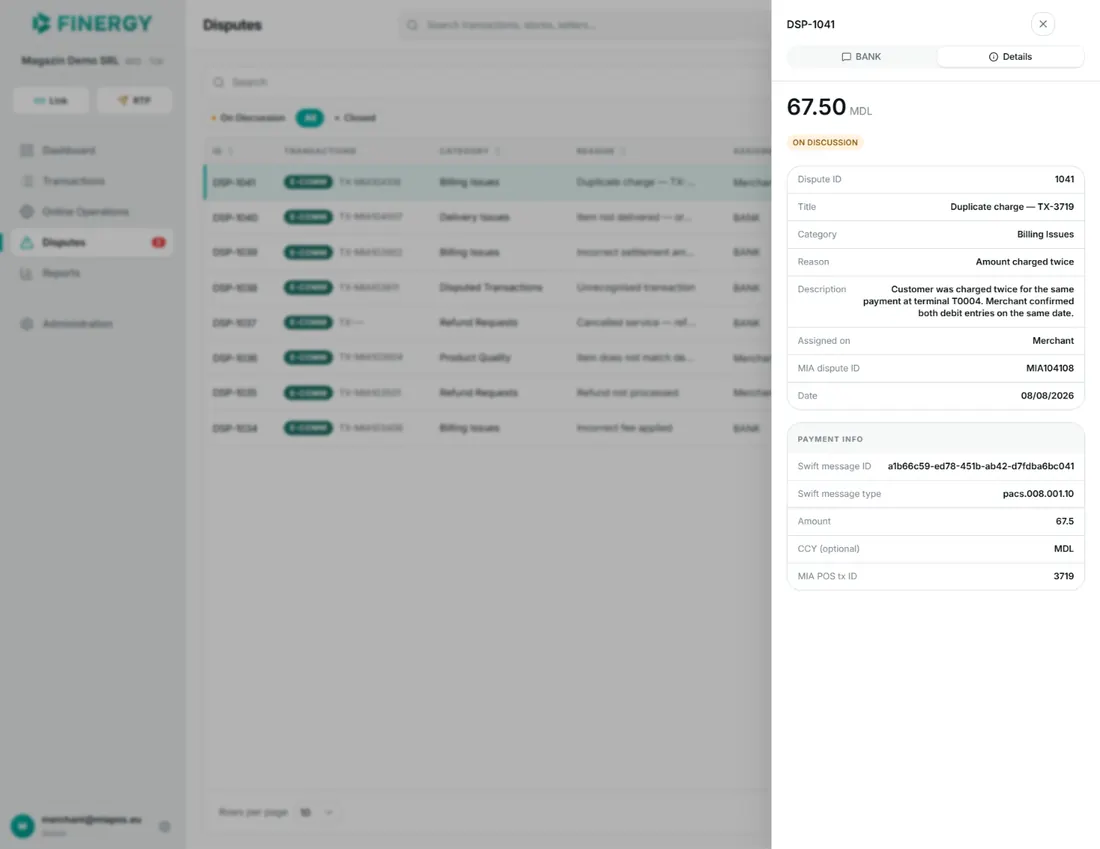
The details panel has two tabs: BANK — the conversation with the bank (the tab open by default) — and Details — the dispute information.
The Details tab shows the disputed amount, the status, and the dispute data: Dispute ID, Title, Category, Reason, Description, Assigned on, MIA dispute ID, and Date. The Payment info block contains the data for the payment involved: Swift message ID, Swift message type, Amount, CCY (optional), and MIA POS tx ID.
Communicating with the bank
The BANK tab shows the conversation with the bank in chronological order: the bank’s messages on the left, the merchant’s messages on the right. New messages appear automatically, without reloading the page. Files attached to messages are downloaded by clicking their name.
While the dispute has the On Discussion status, the message field is available at the bottom of the tab:
- Write your message and press the send button (or the Enter key).
- The paperclip icon attaches a file to the message (one file per message). Only images (JPG, PNG, WebP, SVG) up to 10 MB are accepted. The file is sent together with a text message — it cannot be sent on its own.
For disputes with the Approved, Canceled, or Closed status, the conversation stays read-only.
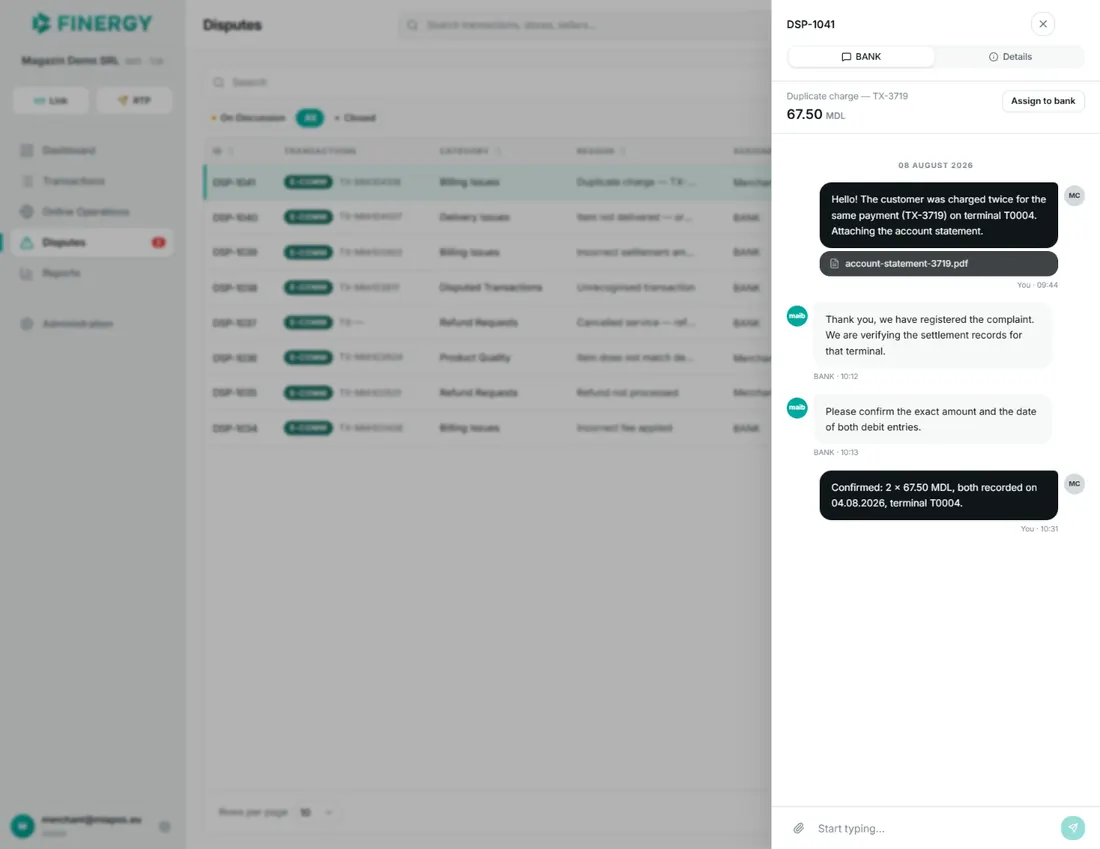
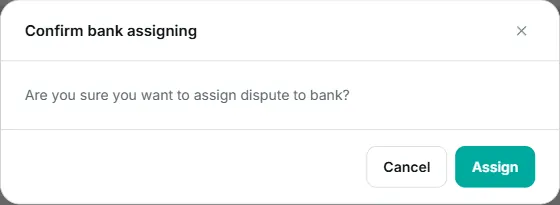
When the dispute is assigned to the merchant and is On Discussion, the Assign to bank button is shown above the conversation — use it after you’ve replied, to transfer the dispute back to the bank for review. Pressing it asks for confirmation (“Are you sure you want to assign the dispute to the bank?”); after confirming, the message “Dispute assigned to bank” appears, and the dispute moves to the bank’s review.
Reports
The Reports section brings together the portal’s downloadable reports. The section is visible to the admin, manager, and reporter roles — the seller role does not have access.
Currently, only one report is available: B2B Payments Report — download data on B2B payments for a selected period. The tips report is downloaded from the Transactions section (see the Exporting transactions to CSV subsection).
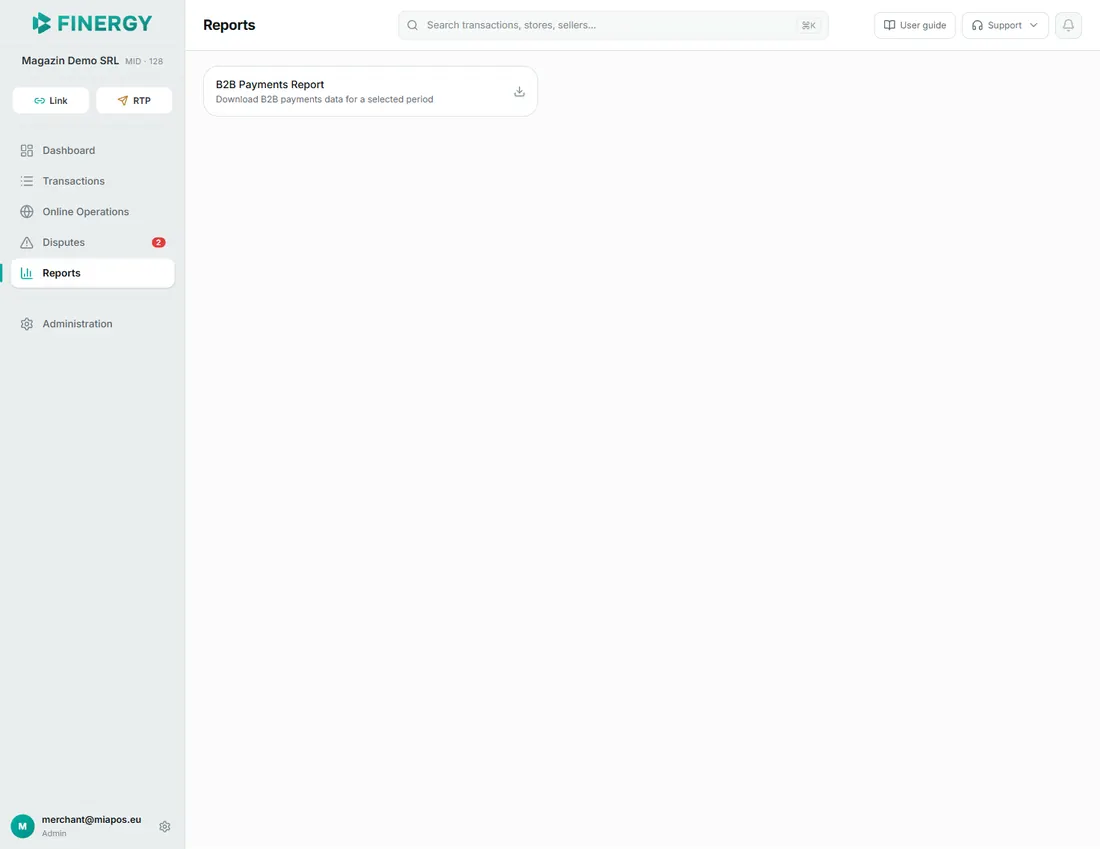
B2B Payments Report
Press the B2B Payments Report card. A window opens where you choose:
- Period — Yesterday (default), Day before yesterday, Last week, or Custom period. For the custom period, the Start date and End date fields appear, with selection from the calendar.
- Store — All stores, or a specific store.
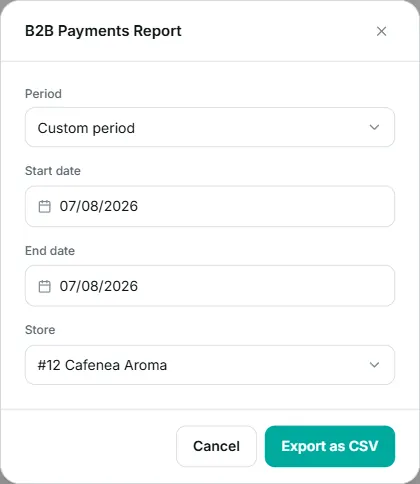
Press Export as CSV. The portal displays the message “Generating the report…”, and once done, the browser downloads the .csv file (which opens directly in Excel or another spreadsheet program), the “Report downloaded” confirmation appears, and the window closes automatically. If there is no data for the chosen period, the message “No data” is displayed, and the window stays open so you can choose another period.
Administration
The Administration section brings together the management of the merchant’s structure: stores, terminals, sellers, users, and the company profile. The section is visible to the admin, manager, and reporter roles.
At the top of the page are five tabs: Stores, Terminals, Sellers, Users, and Profile. The open tab shows, next to it, the number of records found (except for the Profile tab). When there are terminals not attached to a store, a red warning dot appears on the Terminals tab (“There are terminals without a store”).

The first four tabs (Stores, Terminals, Sellers, Users) all work the same way: the search bar filters the records, the lists are paginated (10/25/50/100 rows per page), clicking a row opens the details panel — a side panel from the right, with the Edit button that leads to the edit page — and right-clicking a row opens the context menu with the available actions. On the edit pages, the Save button becomes active after the first change, and Reset restores the data to its saved state. After every successful save or delete, the portal displays a confirmation message.
Stores
The Stores tab shows the merchant’s stores, with the columns: Store ID, Store name, Address, Payment purpose, and Registration date.
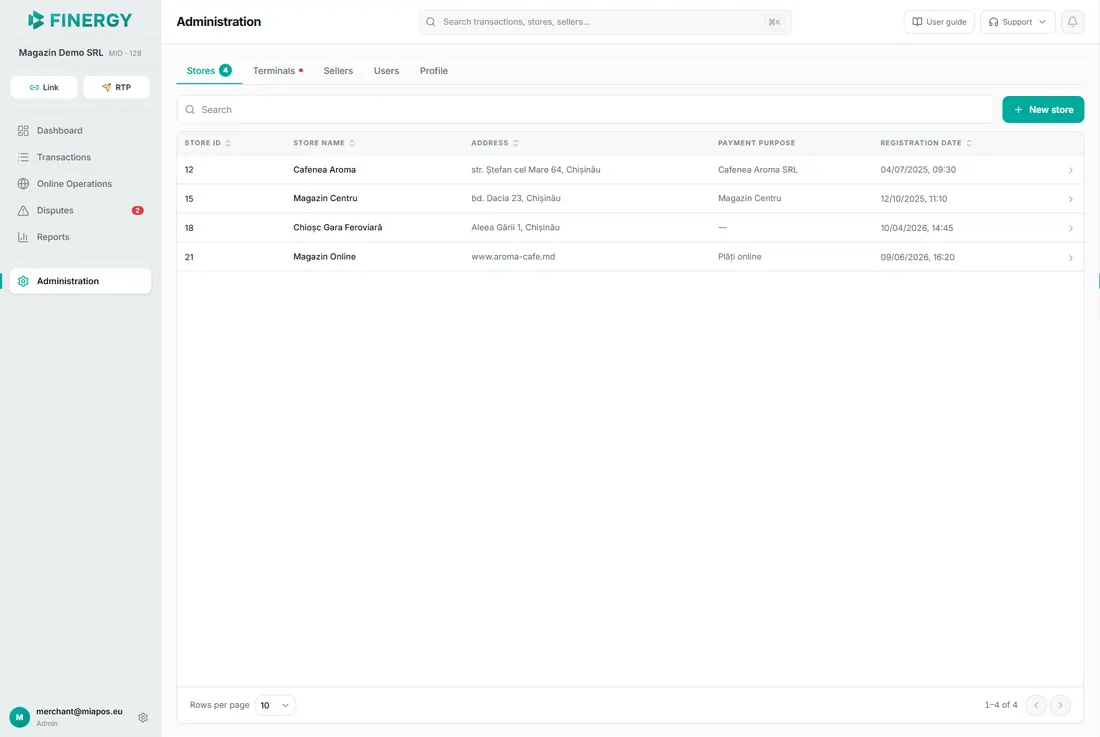
To add a store, press the New store button. The creation page opens, where you fill in:
- Store name (required).
- Address (required).
- Payment purpose — optional, between 2 and 32 characters.
- Comment — optional.
Press Save. The store appears in the list, and the portal suggests the next step: “Next step: add a seller so the store can take payments.” — with a button that opens the new seller form directly, with the store preselected.
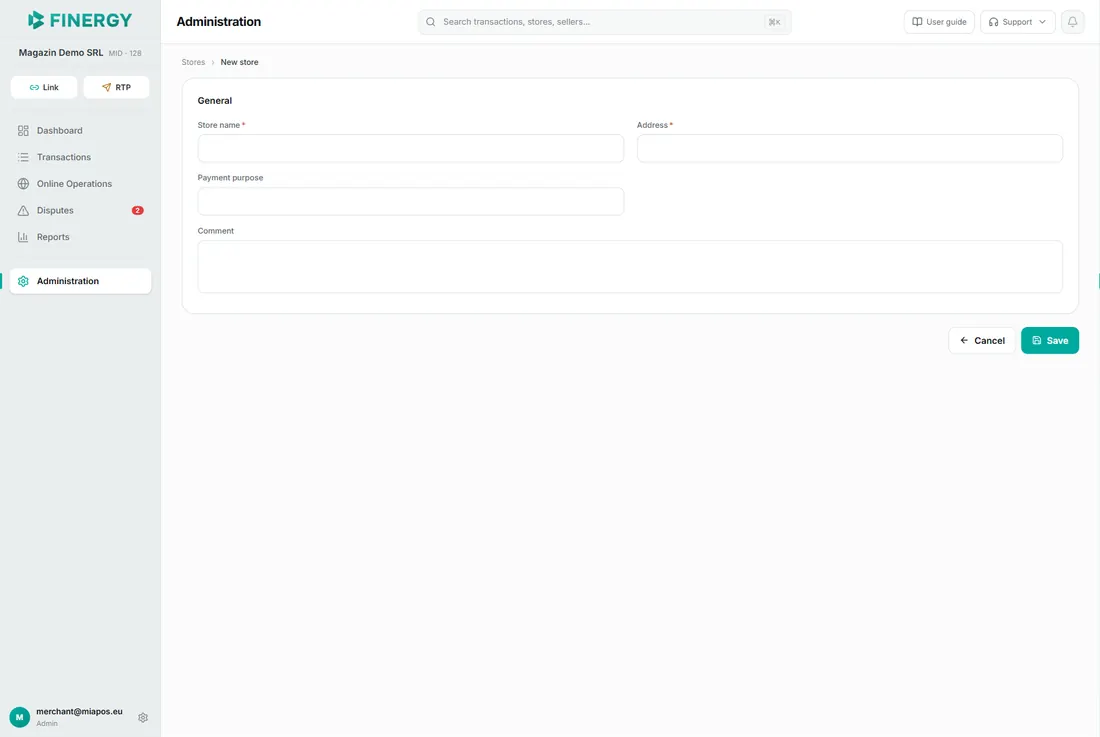
To edit, open the store’s details and press Edit. On the edit page, the same fields can be changed. The Delete button removes the store — the portal asks for confirmation (“Confirm store delete?”) before deleting.
Terminals
The Terminals tab shows the terminals allocated to the merchant. Terminals are registered by the bank — they cannot be created from the portal; here they are attached to stores and configured.
The table columns: POS ID, Terminal ID, Terminal type (Mia POS, Ecomm, RTP, API), Store name, MCC, Status, and Registration date. Possible statuses: Attached, Active, Online, Offline, and Unattached. Terminals without a store are marked with the red “No store” label — such a terminal cannot accept payments.
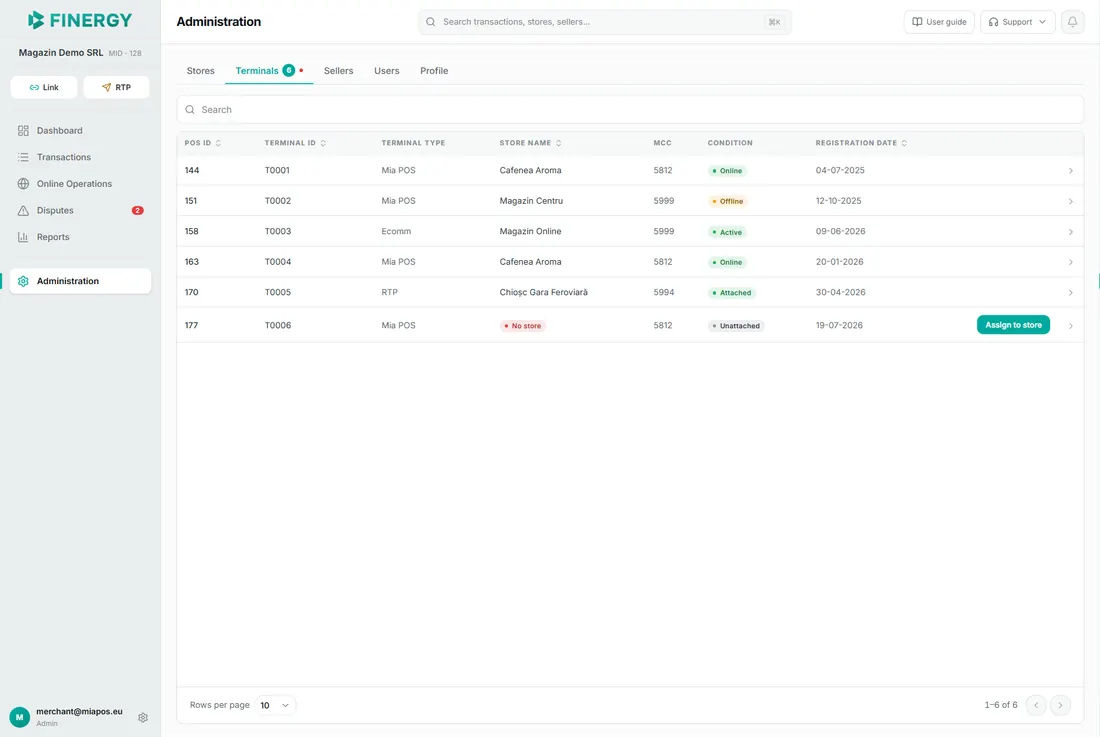
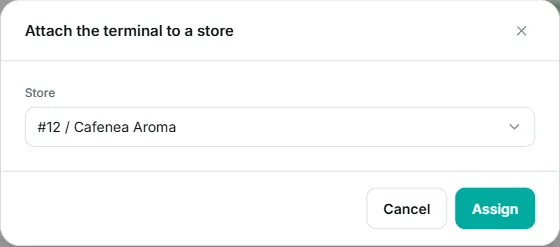
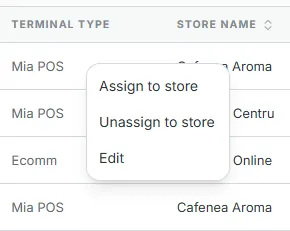
Attaching to a store: press the Assign to store button (shown directly in the row of unattached terminals and in the details panel). A window opens with the list of stores — choose the store and confirm with Assign. The same button is also used to move a terminal already attached to another store. To detach a terminal from a store, use Unassign to store in the details panel and confirm with the Confirm button; after detaching, the quick Assign to store button appears in the terminal’s row.
The terminal’s details panel shows its data (date, POS ID, Terminal ID, type, status, merchant data, MCC, comment, TIPS IBAN), the associated store (with a link to the store’s card), and the current QR settings. The Edit button opens the terminal page, where the left side presents the terminal’s data in read-only mode — including the Data for terminal activation block (IDNO Merchant and Terminal ID, used to activate the terminal) — while the right side, Terminal operation mode, is the only editable area:
- QR Type — the QR code type: Dynamic QR (accepts only a fixed amount, one transaction per QR), Static QR (fixed, controlled, and unspecified amounts, unlimited transactions), or Hybrid QR (fixed and controlled amounts, at most one transaction at a time).
- Amount Type — the amount type: Fixed, Controlled, or Not specified. For Dynamic QR, the field is not shown — the amount is always fixed.
- QR code validity period — in seconds, minimum 30 (default 300).
- Enable tips — lets clients add a tip to the payment.
- POS Lock — prevents changing the settings in the miaPos app on the terminal.
If the terminal doesn’t have saved settings yet, the form shows the default values: Dynamic QR, Fixed amount, 300 seconds, tips and POS Lock disabled.
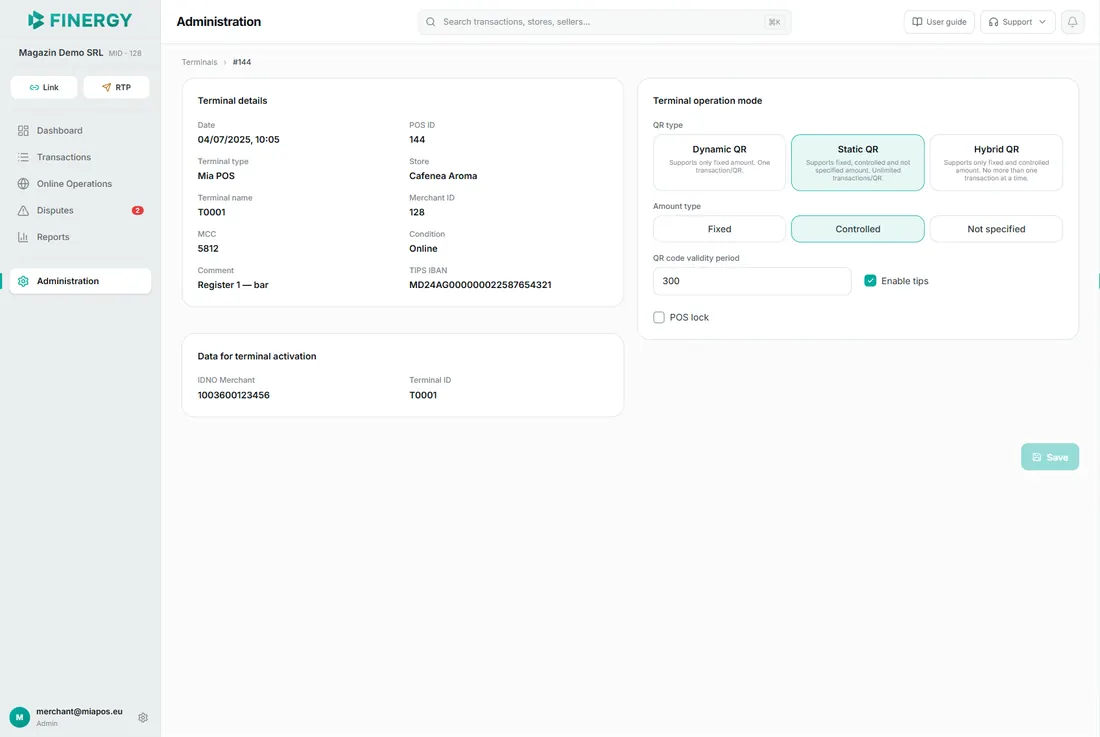
Press Save to apply the settings — after saving, the portal returns to the terminals list. If the terminal has an active QR code, the change is not possible — the portal displays a message asking you to cancel the active QR code. Enabling tips requires a configured tips IBAN; if it’s missing, the portal displays a corresponding message.
Sellers
The Sellers tab manages the people who collect payments at terminals. The table columns: Seller ID, Seller name, Store name, Status, and Registration date. Possible statuses: Online, Offline, and Suspended. Above the table is the status filter (All, Online, Offline, Suspended). Sellers without a store are marked with the red “No store” label — such a seller cannot log into the POS.
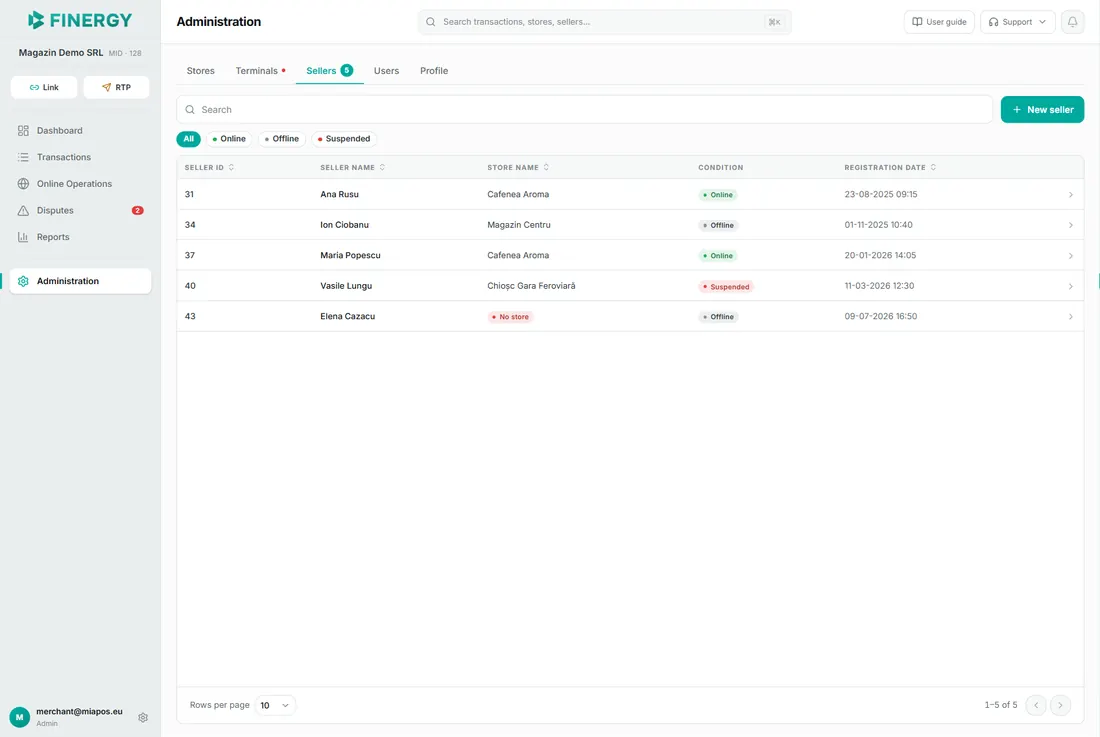
To add a seller, press the New seller button. On the creation page, fill in:
- Seller name (required).
- Store (required) — the store where the seller works. If there is only one store, it’s preselected; if no store exists yet, the portal first suggests creating one.
- Phone number (required).
- Email (required).
- Comment — optional.
In the Credentials block, set the credentials for the POS app:
- Login (required) — 3–30 characters: Latin letters, digits, dots, dashes, and underscores, no spaces. Or check “Use phone number” to use the phone as the login.
- Password (required) — can be entered manually or generated with the Generate button (8 characters: upper- and lowercase Latin letters and digits); the icons next to it show or copy the password.
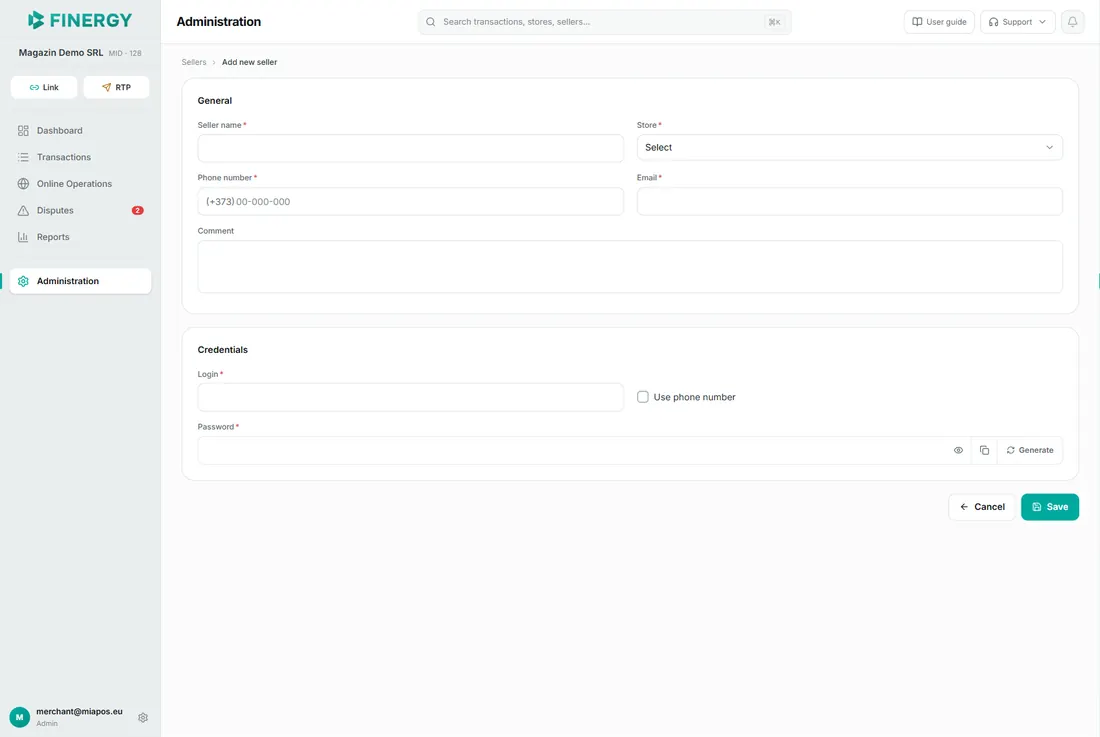
Press Save — the seller appears in the list and can sign in to the POS app with the credentials set.
From the seller’s details panel, the following actions are available:
- Edit — opens the edit page (the same fields; changing the password requires a separate confirmation).
- Reassign — transfers the seller to another store, selecting the store from the list.
- Suspend / Restore — temporarily blocks or reactivates the seller’s access, with confirmation.
- Delete — removes the seller, with confirmation.
The same actions are also available from the context menu — right-click the seller’s row. The context menu works the same way on all the lists in the Administration section (Stores, Terminals, Sellers, Users), with the actions available for each record type.
Users
The Users tab manages the company’s employees’ access to the Merchant Portal. The table columns: ID, Full name, Email, Phone number, Roles, and Registration date.
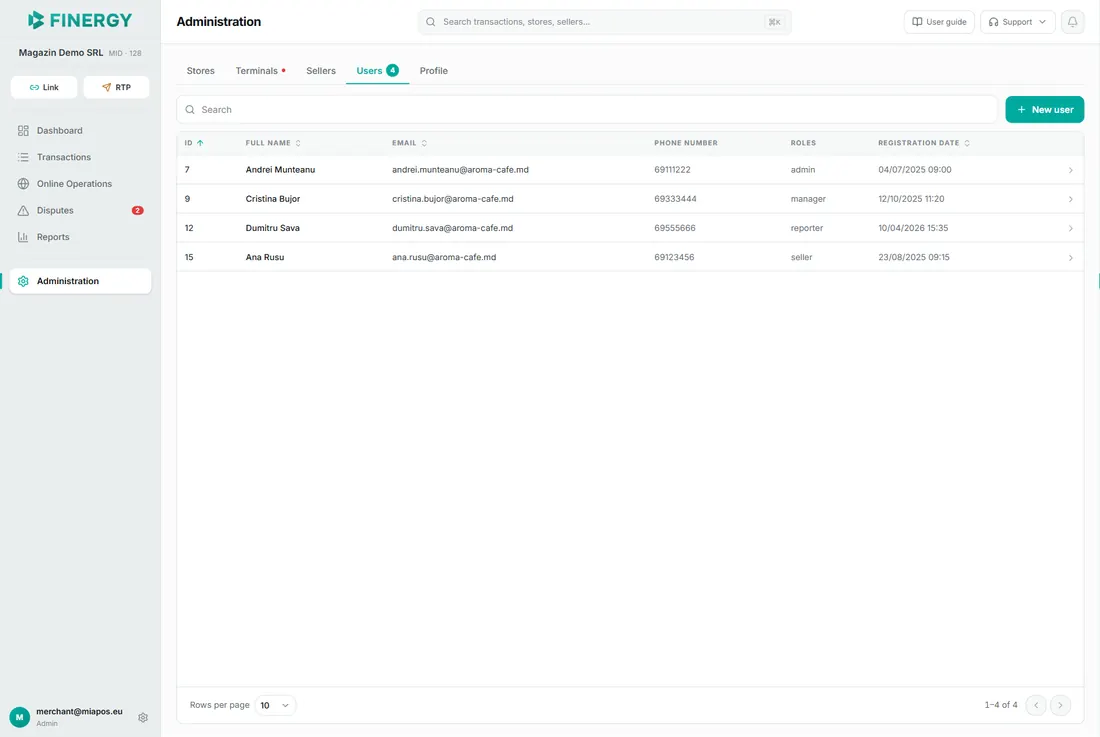
To add a user, press the New user button. On the creation page, fill in the required fields:
- Full name.
- Email.
- Phone number.
- IDNP — 13 digits.
- Roles — one or more roles (admin, manager, reporter, seller — see the role descriptions in the Introduction chapter). The ⓘ icon next to each role shows its description.
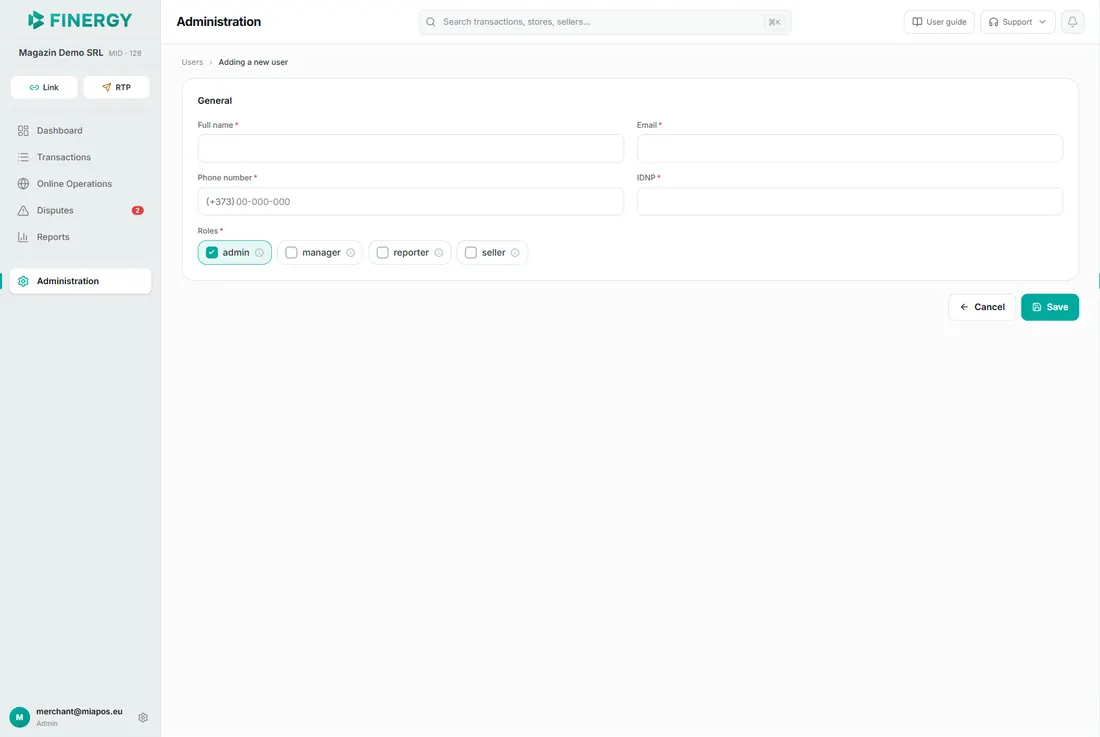
Press Save — the portal opens the page of the newly created user, who can then sign in to the portal with their phone number. To edit, open the user’s details and press Edit; the edit page also has Reset and Delete (with confirmation).
Merchant Profile
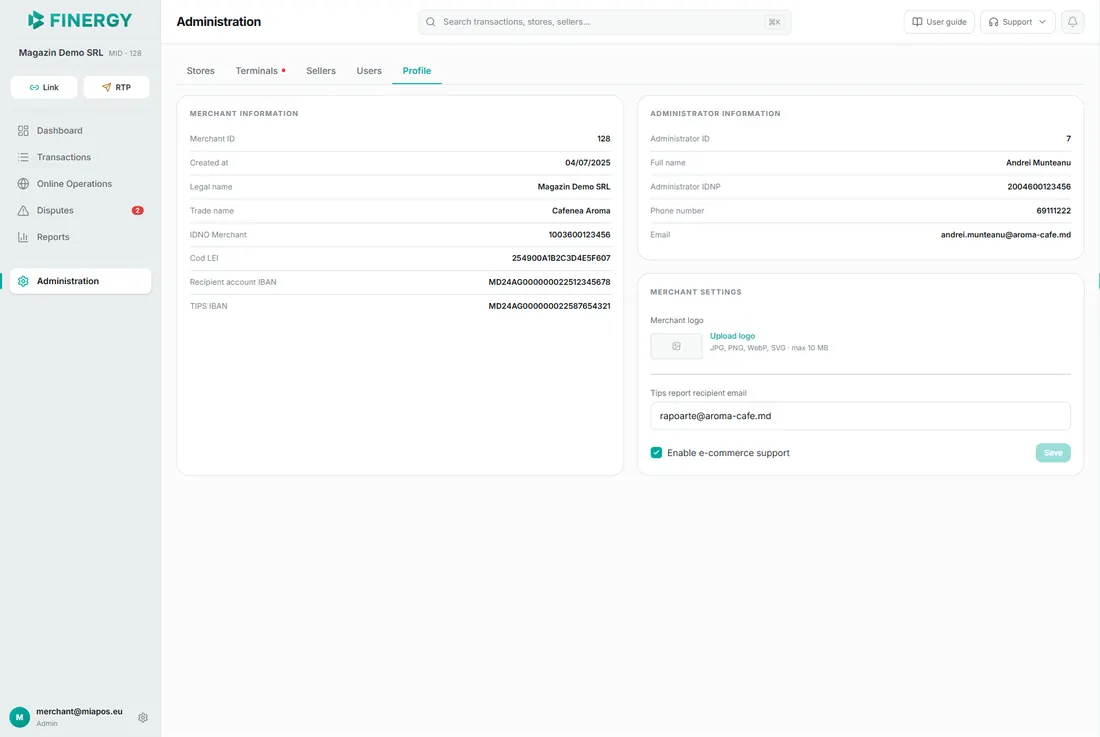
The Profile tab shows the company’s data, in read-only mode:
- Merchant information — Merchant ID, Created at, Legal name, Trade name, IDNO Merchant, Cod LEI, Recipient account IBAN, and TIPS IBAN.
- Administrator information — Administrator ID, Full name, Administrator IDNP, Phone number, and Email.
The Merchant settings block is visible only to the admin and manager roles (the reporter role sees the page in read-only mode only) and allows you to:
- Merchant logo — upload, change, or remove the logo shown at the top of the sidebar menu. Accepted formats: JPG, PNG, WebP, SVG, up to 10 MB.
- Tips report recipient email — the address the tips reports are sent to.
- Enable e-commerce support — turns on the e-comm functionality for the merchant.
Press Save to apply the changes — the confirmation “Merchant settings successfully updated” appears.
Platform Features
This chapter describes the features available in every section of the portal: global search, keyboard shortcuts, language and theme settings, and signing out.
Global search
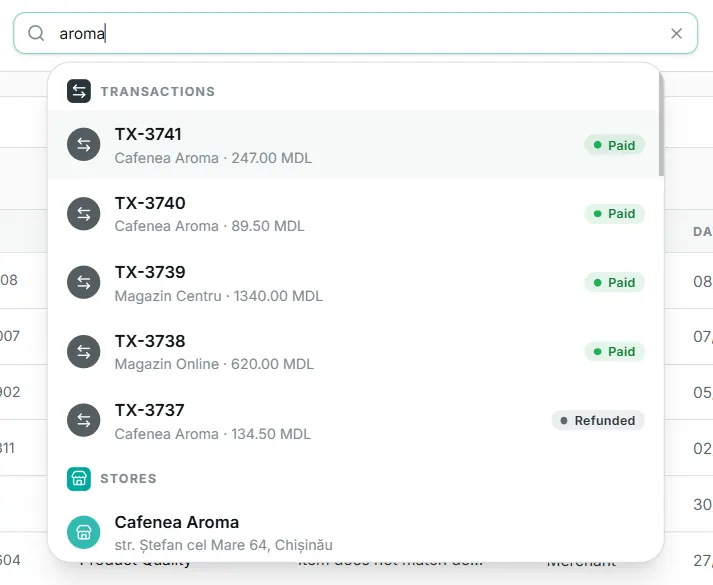
The search bar at the top of the screen (“Search transactions, stores, sellers…”) searches the entire portal at once: transactions, stores, sellers, terminals, payment requests (RTP), and users. Transactions are searched over the last 3 years.
Enter at least 2 characters — the results appear immediately below the search bar, grouped by category (Transactions, Stores, Sellers, Terminals, Request to Pay, Users), each result with its title, details, and, where applicable, its status. Each category shows at most 5 results — for a complete search, open that section and use its own search.
Selecting a result opens the corresponding section, with that record preselected and its details panel open.
On narrow screens, the bar is collapsed to a search icon — tap it to open the field to full width.
Keyboard shortcuts
- Ctrl+K (⌘K on Mac; the hint in the search field always shows the ⌘K symbol) — activates global search, from any section.
- ↓ / ↑ — navigate through the search results.
- Enter — opens the selected result.
- Esc — closes the results list; it also closes open modal windows and details panels.
Language and theme
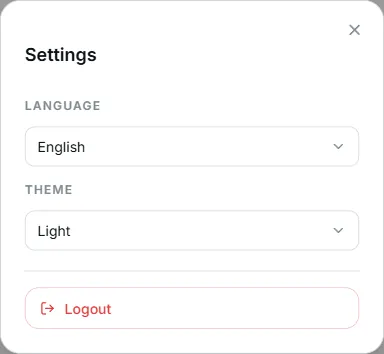
Press the gear icon at the bottom of the sidebar menu (on narrow screens, first open the menu from the button in the top-left corner) — the Settings window opens:
- Language — the portal is available in 5 languages: Română (default), Русский, English, Deutsch, Français. The language can also be chosen from the sign-in screen.
- Theme — the portal’s appearance: Light, Dark, or Dusk.
Both changes apply immediately, without a confirmation button, are kept on the current device, and remain active on the next sign-ins.
Signing out
In the same Settings window, at the bottom, is the red Logout button. Pressing it closes the session immediately, and the portal returns to the sign-in screen.

Support
For questions and issues related to the portal or to payments, use the Support menu in the top bar of the screen (the headset icon). The menu contains the contact channels:
- Your bank’s support phone number (if the bank has set it up).
- Your bank’s support email (if the bank has set it up).
- Telegram — the miaPOS support bot (@miaPOSLineBot), always available.
Selecting a channel automatically copies the contact details and opens the corresponding app (phone call, email, or Telegram).
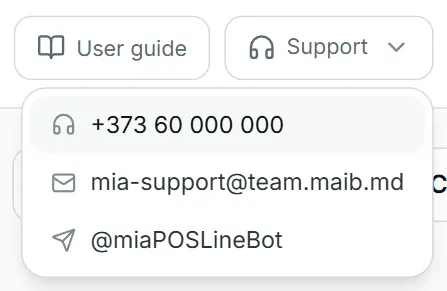
The phone number and email shown belong to the bank that services the merchant, so they may differ from one merchant to another. Your bank is shown by its logo, at the top of the sidebar menu.
Before signing in, the sign-in screen shows the general miaPOS contacts: phone +373 60 665 335 and email [email protected].